Welcome to Part 19 of this series of guides on how to integrate Gmail with Angular and Spring Boot.
Now it's time to send an email back.
You've already seen how to send an email from scratch. Now you'll learn how to reply to an email.
And the good news is: you've already laid the foundation to make it happen.
In this guide, I'll help you build on that foundation.
Alternatively, you can take a look at the source on GitHub.
To Date
Thus far in the series, you have:
- Created an OAuth2 client ID and secret on Google Cloud Console
- Enabled the Gmail API via Google Cloud Console
- Set the necessary properties in your Spring Boot application.properties file
- Set up a DataStore implementation with its associated factory
- Set up a refresh listener
- Created a utility class that handles the Google authorization code flow
- Set up proper Gmail consent with the Google Cloud Platform
- Created a controller that handles a request to get the Google authorization code flow URL
- Used Postman to get the Google authorization code URL
- Used that URL to authorize your application to access your Gmail inbox
- Updated the controller so it handles a token request
- Updated the utility class so it creates the credential from a token
- Persisted that credential
- Used Postman to retrieve the token
- Learned why you didn't actually need to retrieve the token
- Learned about the structure of the Message object
- Learned about MIME
- Created an Email type that gets sent back to the client
- Wrote code that converts a Message object to an Email object
- Instantiated the Gmail service
- Used the Gmail service to retrieve just the messages you want to retrieve
- Used the Gmail service to extracted full Message objects from very lightweight objects
- Added a new endpoint to listen for inbox requests
- Used that endpoint to send back the user's most recent emails
- Learned how to disallow your application from accessing your inbox
- Created a new component on the Angular side that shows emails from the user's inbox
- Created a new service on the Angular side that retrieves emails from the Spring Boot microservice
- Optimized the payload response from the microservice
- Displayed HTML reference characters as they should be displayed
- Got rid of whitespace that isn't whitespace
- Designed a user-friendly, responsive inbox
- Created a UI so people can read individual email messages
- Learned about the security risks associated with displaying full HTML messages from the Gmail API
- Updated the back-end microservice to support sending emails
- Created a new component to handle sending an email
- Implemented a WYSIWYG editor to make it easy for users to send HTML emails
And if you haven't done those things, Part 1 is waiting for you.
The Next Date
In this guide, you will:
- Add a toolbar to the email message UI
- Add an icon button to that toolbar to enable users to quickly reply to the email
- Populate an email form with values derived from the email message the user is replying to
And then you can go back to deciding which curtain design would look best in your bonus room.
In the Service
Get the ball rolling by adding several support methods in EmailService.
  getEmailHistory(replyToEmail: Email): string {
    let emailHistory: string = '';

    if (replyToEmail) {
      if (replyToEmail.html) {
        emailHistory = replyToHtmlSeparator + replyToEmail.html;
      } else {
        emailHistory = replyToHtmlSeparator + replyToEmail.plainText;
      }
    }

    return emailHistory;
  }

  getEmailAddressFromString(emailAddress: string): string {
    let justEmail: string = emailAddress;

    if (emailAddress && emailAddress.indexOf("<") > -1) {
      let regex = /<(.*)>/g;
      let matches = regex.exec(emailAddress);

      if (matches.length > 0) justEmail = matches[1];
    }

    return justEmail;
  }

  getReplySubject(replyToEmail: Email): string {
    let subject: string = '';

    if (replyToEmail && replyToEmail.subject) {
      let oldSubject: string = replyToEmail.subject;

      if (!oldSubject.toLowerCase().startsWith('re:')) {
        subject = 'Re: ' + oldSubject;
      }
    }

    return subject;
  }
The first method, getEmailHistory(), accepts an Email object that contains all the details about the email the user is replying to.
Then, it prepends the body of that email with several HTML breaks and a dotted line. That string will get prepulated in the WYSIWYG editor that the user will use to compose an email.
It's similar to what you see in many email clients when a user replies. The old message is at the bottom of the current message so people reading the current message can check the context.
By the way, that replyToHtmlSeparator is a constant that looks like this:
const replyToHtmlSeparator: string = '<br/><br/><br/>-----<br/><br/>';The getEmailAddressFromString() method extracts just the email address from a string like "Joe Blow <joeblow@nomail.com>".
That's necessary to populate the "To" field with just the email address so it passes validation.
I've explained how to get just the email address from a string in a separate guide.
The getReplySubject() method prepends an "Re: " to the subject line unless there's one already there.
A New Toolset
Next, head over to message.component.html. Add the toolbar just above the <mat-card> element.
    <mat-toolbar>
      <button mat-icon-button aria-label="Back to inbox" (click)="back()">
        <mat-icon>arrow_back</mat-icon>
      </button>
      <button mat-icon-button aria-label="Reply" (click)="reply()">
        <mat-icon>reply</mat-icon>
      </button>
    </mat-toolbar>
Remember: this is the component the user accesses to read a single email.
In the code block above, you'll see just two icon buttons. The first one is a "Back" arrow that takes the user back to the inbox. The second one is a "Reply" button that enables the user to reply to the current message.
By the way: before you can use <mat-toolbar>, you'll have to first import MatToolbarModule in UserModule.
Now head over to the component class and add the two methods that support those icon buttons:
  back() {
    let route = '/user/email/inbox';
    this.router.navigate([route]);
  }

  reply() {
    let route = '/user/email/compose-email';
    this.router.navigate([route], { state: { currentEmail: this.email } });
  }
Hone in on the second method for now. You can see that it's sending the user to the route you'd expect: /user/email/compose-email.
But... it's sending the user there with a present. The code uses NavigationExtras to send along an Email object representing the email that the user is replying to. That's the currentEmail property in the state object.
I explain how all that works in my guide on how to pass objects between routes in Angular. So I won't rehash it here.
Composition 101
Think about it: when a user replies to an email, the user is really just composing a new email with some of the fields prepopulated. That's all it is.
So the application just needs to take the user to the "compose an email" page and prepopulate those fields. That's what you'll see here.
When the user accesses the route that's handled by ComposeEmailComponent, the application will grab that Email object that got sent along with the route. Then, it will use the info from the Email object to prepopulate the email form.
That's easy!
Moreover, you've already handled the heavy lifting associated with prepopulating the "To," "Subject," and "Body" fields when you created those methods in the service layer a couple of sections ago.
So here's what needs to happen in the constructor of ComposeEmailComponent:
  constructor(private fb: FormBuilder, private emailService: EmailService,
    private userService: UserService, private alertService: AlertService,
    private router: Router) {

    let nav: Navigation = this.router.getCurrentNavigation();

    if (nav.extras && nav.extras.state && nav.extras.state.currentEmail) {
      this.replyToEmail = nav.extras.state.currentEmail as Email;
    }
  }
In a nutshell, that's going to grab the Email object that got sent with the route when the user clicked the "Reply" icon. It's going to set the component property replyToEmail to that object.
And then you need to update the createFormGroup() method:
  private createFormGroup() {
    this.form = this.fb.group({
      'html': [
        this.emailService.getEmailHistory(this.replyToEmail),
        Validators.compose([Validators.required])
      ],
      'to': [
        this.emailService.getEmailAddressFromString(this.replyToEmail.from),
        Validators.compose([
          Validators.required,
          Validators.pattern("^[a-z0-9._%+-]+@[a-z0-9.-]+\.[a-z]{2,4}$")
        ])
      ],
      'subject': [
        this.emailService.getReplySubject(this.replyToEmail),
        Validators.compose([Validators.required])
      ]
    });
  }
Take a look at the default value for each of the fields. In all three cases, they reference one of the methods you created on EmailService. That's how the form gets prepopulated.
By the way: if the user is creating a brand new email and not replying to anything, all three of those methods evaluate to null or an empty string. So nothing bad happens in that situation.
Testing It Out
Okay, let's see if these code changes have the desired effect.
Save everything and fire up your Angular app. Fire up the supporting User and Email downstream microservices as well.
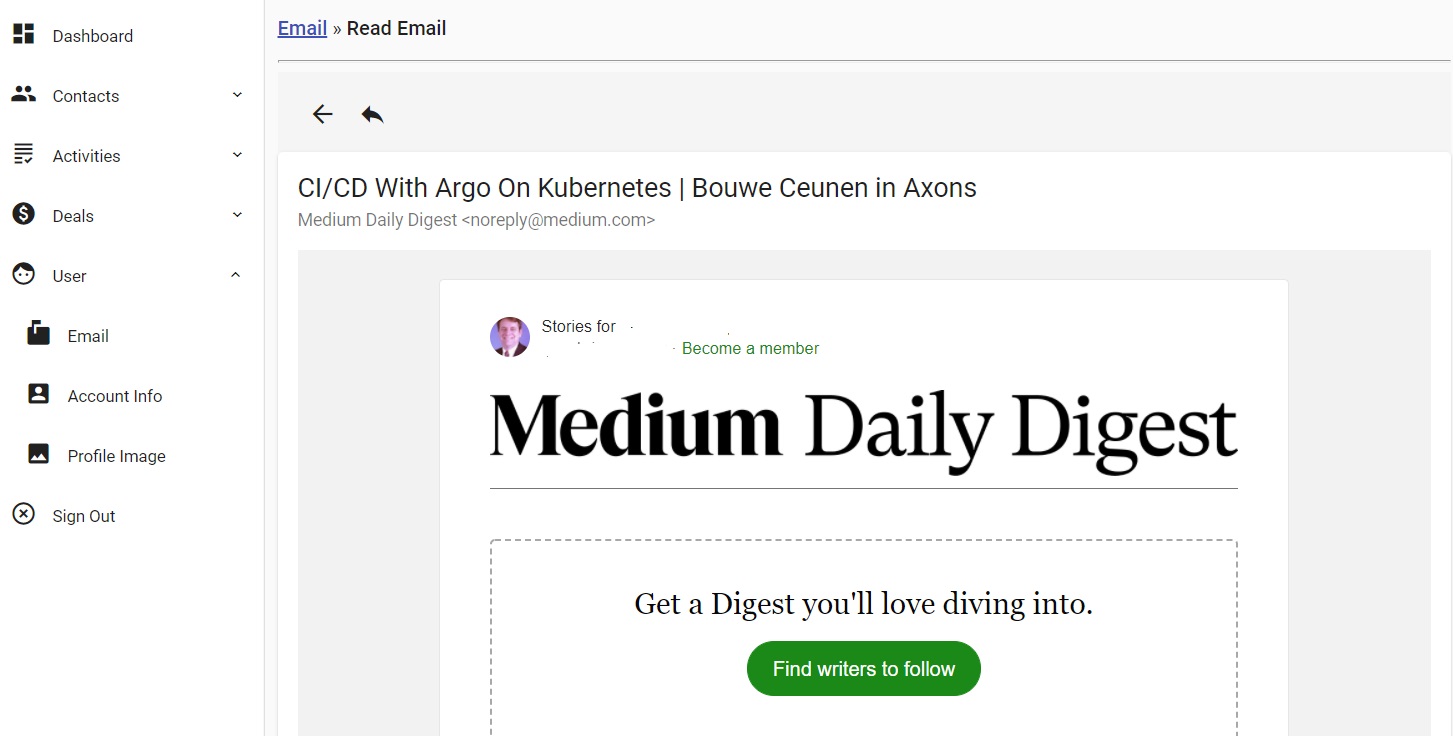
Log in to the application using your usual credentials. Then, select User and Email from the left-hand sidebar. Click on an email you'd like to reply to.
Here's the email I'm working with:

Now I'm going to reply to that email even though the email address says "noreply." Hey, we're just testing things out here...
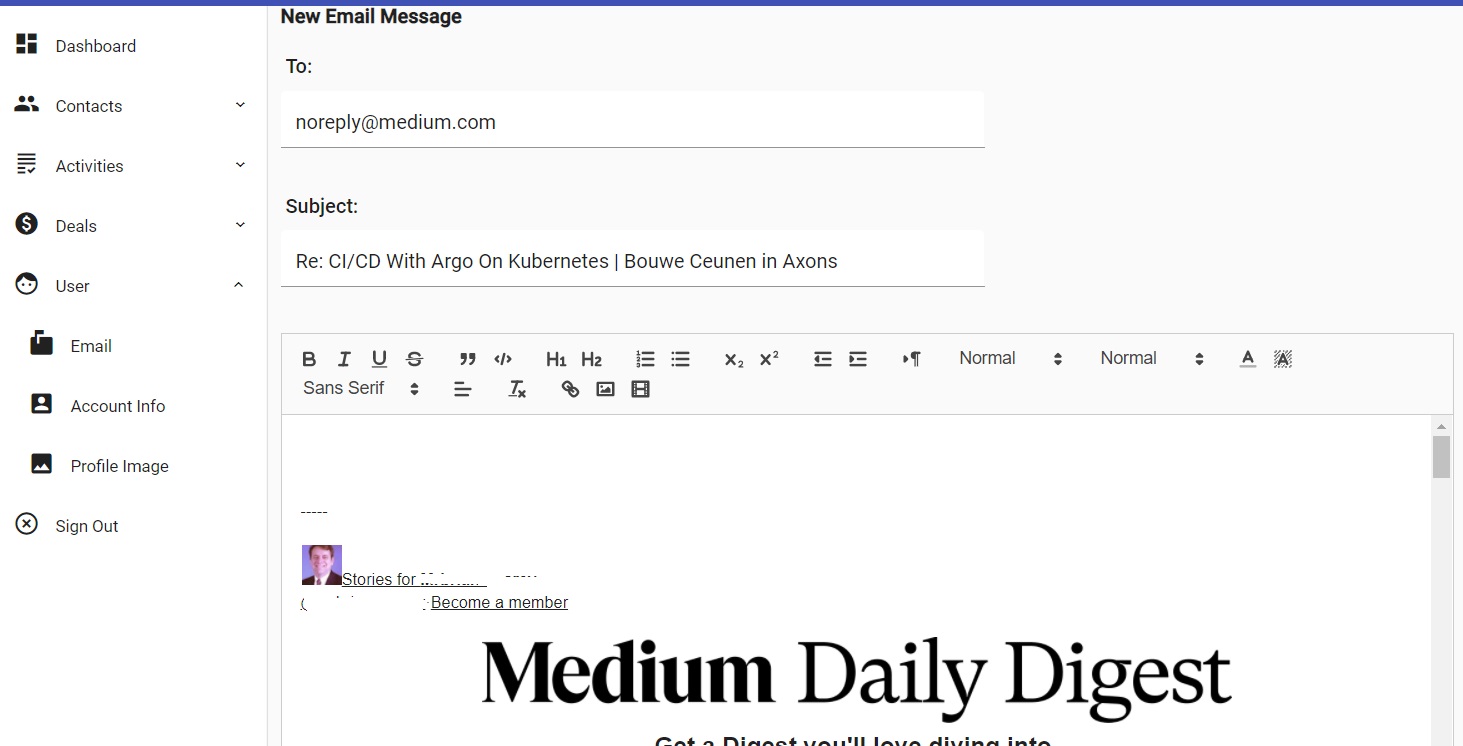
And when I do click that reply icon, I'm taken to the new "compose an email" route and this is what I see:

There you go. It prepopulated the "To" field with the sender's email address. It added "Re: " in front of the original subject as well.
And it put the original message down towards the bottom of the email I'm sending. That's what I want to see.
Keep in mind: you'll likely find that some HTML messages aren't perfectly formatted when you reply to them. That's okay for now. We can clean those up later but it's not a high priority issue at this time.
Now see if you're getting similar results. If so, then you're well on your way to adding a an integrated email client in your app!
Wrapping It Up
Getting closer. You've made some awesome strides if you've stuck with the series thus far.
Soon, you'll have something you can brag to your propeller-head friends about.
Until then, have fun!
Photo by Tara Winstead from Pexels


