If your Angular app requires authentication, then you'll also want to prevent unauthorized access to some routes. You can do that with route guards.
In this guide, I'll show you how to use features from the @angular/router package to ensure that only authorized users get access to certain parts of your Angular site.
If you want to check out the source code, you can do so on GitHub. Otherwise, read on.
Remember, though: if you're having problems running the Angular app locally, be sure to check the README.
Please note: this guide is a part of an ongoing series of tutorials on how to create a customer relationship management (CRM) application from scratch. The GitHub code for each guide belongs to a specific branch. The master branch holds the entire application up to the current date. If you want to follow the whole series, just view the careydevelopmentcrm tag. Note that the website displays the guides in reverse chronological order so if you want to start from the beginning, go to the last page.
The Business Requirements
Your boss Smithers walks into your office with a complaint.
"I noticed you got that login part of the CRM app working correctly," he says snottily. "But all it does is log the JSON web token! How about an actual login solution that forwards people to the dashboard!"
Also, he says he'd like you to make sure that people who aren't logged in can't get to any of the features pages of the app.
"Well, that's all for now I guess," he says as he walks out of your office.
Authentication Service, Moved
If you're following along through the whole series of guides, I need to go over a change I made from the previous article.
I moved authentication.service.ts back to src/app/services.
Why? Because, as you'll soon see, it's not going to be used only by the login module. Other modules will need it as well.
Speaking of that class, take a look at a change I made to a few methods:
   logout() {
        localStorage.removeItem("id_token");
        localStorage.removeItem("expires_at");

        this.router.navigate(["/login"]);
   }

   isLoggedIn(): boolean {
        let loggedIn: boolean = false;
        let expiration = this.getExpiration();

        if (expiration) {
            return Date.now() < expiration;
        }

        return loggedIn;
    }

...

    private getExpiration(): number {
        let expiresAt: number = null;

        const expiration = localStorage.getItem("expires_at");

        if (expiration) {
            expiresAt = JSON.parse(expiration);
        }

        return expiresAt;
    }
The big change in the logout() method is the app now navigates the user back to the login page. That seems like a great place to take somebody who just logged out.
In the isLoggedIn() method, the code defaults loggedIn to false.
The reason for that is simple: if getExpiration() returns null, then the code will assume the user is not logged in.
On the other hand, if the method returns a number corresponding to a date, and the current date is less than that date, then the token hasn't yet expired. The user is still logged in.
In the getExpiration() method, the code defaults expiresAt to null. Yes, you can do that with a number in TypeScript.
If the code can't find a value named expires_at in localStorage, then it will return that null. In that case, it's assumed that the user is not logged in. See above.
If there is a valid date number in localStorage, the method parses it and returns it.
The Auth Guard
Time for a new service! It's the route guard that will determine if users have access to specific routes.
In the services folder, create auth-guard.service.ts. Make it look like this:
import { Injectable } from '@angular/core';
import { Router, CanActivate, ActivatedRouteSnapshot, RouterStateSnapshot } from '@angular/router';
import { AuthenticationService } from './authentication.service';

@Injectable({ providedIn: 'root' })
export class AuthGuard implements CanActivate {
    constructor(private router: Router, private authenticationService: AuthenticationService) { }

    canActivate(route: ActivatedRouteSnapshot, state: RouterStateSnapshot) : boolean {
        const isLoggedIn = this.authenticationService.isLoggedIn();

        if (isLoggedIn) {
            return true;
        }

        this.router.navigate(['/login'], { queryParams: { returnUrl: state.url } });
        return false;
    }
}
First of all, take note of all the imports coming in from @angular/router. That's the package that will be doing most of the heavy lifting for the requirements that Smithers laid on your desk.
Also: the class implements CanActivate. What the heck is that?
It's an interface.
Like most interfaces, it requires you to implement a method. That method's name is canActivate() and it returns a boolean.
That boolean, as you might have guessed determines whether or not the user has access to a specific route. A true return means yes while a false return means no.
The canActivate() method takes two parameters: ActivatedRouteSnapshot and RouterStateSnapshot.
Only the second parameter, RouterStateSnapshot, is used in this implementation. I might need to use ActivatedRouteSnapshot in the future so I'll leave it in.
Also, quite frankly, this implementation requires ActivatedRouteSnapshot in the method signature.
Next, the code calls a familiar method: isLoggedIn() on AuthenticationService.
If that method returns true, the user is granted access to the route. Otherwise, the app sends the user to the login page to enter his or her credentials.
Also, note that when the app sends the user to login, it also adds a request parameter named returnUrl.
What's the point of that? So the user goes back to the original URL after a successful login. It's a user-friendly maneuver.
A New Menu Item
Next, head over to src/app/features/ui/model. Edit menu.ts and add the following menu item:
  {
      displayName: 'Sign Out',
      iconName: 'highlight_off'
  }
That adds a simple "Sign Out" menu item so the user can easily log out of the app.
You might notice that it doesn't have a route property like other menu items. That's because it's not a typical addition to the menu.
In this case, you'll want the app to perform some logic rather than simply taking the user to a new route. Fortunately, you've already coded that logic in the logout() method in AuthenticationService.
However, you're going to need some code to go with your new menu item. Edit menu-list-item.component.ts in src/app/features/ui/menu-list-item.
Make the following update to the onItemSelected() method:
    onItemSelected(item: NavItem) {
        if (!item.children || !item.children.length) {
            if (item.route) {
                this.router.navigate([item.route]);
            } else {
                this.handleSpecial(item);
            }
        }

        if (item.children && item.children.length) {
            this.expanded = !this.expanded;
        }
    }
The big difference there from the previous guide is that the code checks to see if item.route exists. If not, then it follows the handleSpecialItem() method.
Here's what that method looks like:
    handleSpecial(item: NavItem) {
        if (item.displayName == 'Sign Out') {
            this.handleSignOut();
        }
    }
It checks the display name of the menu item. If it's equal to "Sign Out," then the code follows handleSignOut().
And here's that method:
    handleSignOut() {
        this.authenticationService.logout();
    }
Pretty simple, huh? It just calls logout() on AuthenticationService.
Updates to LoginComponent
Next, edit login.component.ts in src/app/login. Update the code so it looks like this:
import { Component, OnInit } from '@angular/core';
import { AuthenticationService } from '../services/authentication.service';
import { FormGroup, FormBuilder, Validators } from '@angular/forms';
import { Router, ActivatedRoute, ParamMap } from '@angular/router';
import { JwtResponse } from '../models/jwt-response';
import { UrlService } from '../services/url.service';

@Component({
  selector: 'app-login',
  templateUrl: './login.component.html',
    styleUrls: ['./login.component.css']
})
export class LoginComponent implements OnInit {
    form: FormGroup;
    formSubmitted: boolean = false;

    constructor(private fb: FormBuilder, private authenticationService: AuthenticationService,
      private router: Router, private route: ActivatedRoute, private urlService: UrlService) { }

    ngOnInit() {
        this.form = this.fb.group({
            'username': ['', Validators.compose([Validators.required])],
            'password': ['', Validators.compose([Validators.required])]
        });
    }

    onSubmit(loginForm) {
        this.formSubmitted = true;

        if (this.form.valid) {
            let username = this.form.controls['username'].value;
            let password = this.form.controls['password'].value;

            let user$ = this.authenticationService.login(username, password);

            user$.subscribe(
                (jwtResponse: JwtResponse) => this.handleLoginResponse(jwtResponse),
                err => console.error(err)
            );
        } else {
            console.log("The form is NOT valid");
            this.formSubmitted = false;
        }
    }

    handleLoginResponse(jwtResponse: JwtResponse) {
        console.log(jwtResponse);

        if (jwtResponse && jwtResponse.token) {
            this.goToRoute();
        }

        this.formSubmitted = false;
    }

    private goToRoute() {
        let map: ParamMap = this.route.snapshot.queryParamMap;
        let returnUrl = map.get('returnUrl');
        let queryParams: any = {};

        if (returnUrl) {
            queryParams = this.urlService.getQueryParams(returnUrl);
            returnUrl = this.urlService.shortenUrlIfNecessary(returnUrl);
        } else {
            returnUrl = '/dashboard';
        }

        this.router.navigate([returnUrl], queryParams);
    }
}
Pay particular attention to the handleLoginResponse() method. That if check makes sure that the user got back a valid login response from the server. If so, then it forwards the user to the appropriate route.
What's the appropriate route? Well, take a look at goToRoute(). That method checks for the existence of a returnUrl parameter in the URL.
If that parameter exists, then the app forwards the user to that route. Otherwise, it forwards the user to the dashboard.
By the way, that method uses UrlService. That's a service with some convenience methods that make it easy to parse URLs.
Tackling AppRoutingModule
Finally, take a look at app-routing.module.ts. Edit it to look like this:
import { NgModule } from '@angular/core';
import { Routes, RouterModule } from '@angular/router';
import { FeaturesComponent } from './features/features.component';
import { AuthGuard } from './services/auth-guard.service';

const routes: Routes = [
    { path: '', pathMatch: 'full', redirectTo: 'home' },
    { path: 'home', loadChildren: () => import('./home/home.module').then(m => m.HomeModule) },
    { path: 'login', loadChildren: () => import('./login/login.module').then(m => m.LoginModule) },
    {
        path: '',
        component: FeaturesComponent,
        children: [
            { path: 'dashboard', canActivate: [AuthGuard], loadChildren: () => import('./features/dashboard/dashboard.module').then(m => m.DashboardModule) },
            { path: 'user', canActivate: [AuthGuard], loadChildren: () => import('./features/user/user.module').then(m => m.UserModule) }
        ]
    }
];

@NgModule({
    imports: [
        RouterModule.forRoot(routes)
    ],
    exports: [RouterModule],
    providers: []
})
export class AppRoutingModule { }
Pay attention to the routes constant. You'll see that the route guard is referenced repeatedly in the children array under FeaturesComponent.
That canActivate property means exactly what you think it means. The user can only access that route if the canActivate() method in the route guard (in this case, AuthGuard) returns true.
Checking the Results
That's it for the coding. Now it's time to see if this thing works.
Go to the command line and navigate to the root directory of your app's source code. Then, type this at the command line:
ng serve
Wait for everything to load. Then, fire up Chrome.
Also, make sure you start your UserApplication web service. If you're new here, you can learn more about that from a previous guide or just pick up the code on GitHub.
Now, navigate to the following URL in Chrome: http://localhost:4200/dashboard
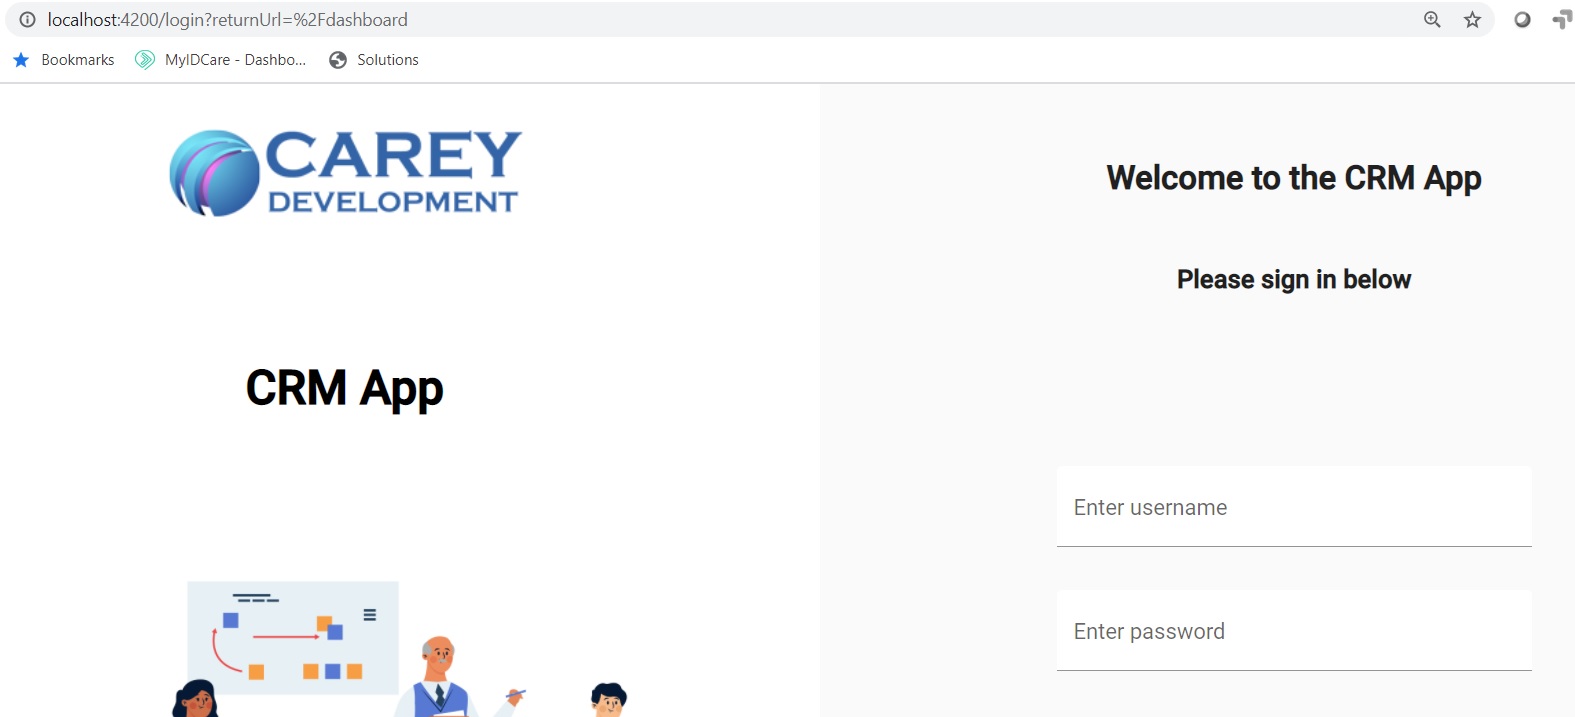
That should take you straight to the dashboard. But watch what happens:

Ah, look! It didn't take you to the dashboard after all!
It took you to the login screen instead.
Why? Because that's what you told it to do.
The route guard sends people who aren't logged in to the login page by default.
Also, check out the new URL: http://localhost:4200/login?returnUrl=%2Fdashboard
Do you see that returnUrl parameter? That's the URL you'll go to once you login successfully.
By the way, that %2F thing you see is a URL encoded slash. It really means /dashboard.
So go ahead and login with the usual credentials: username is "darth" and password is "thedarkside".
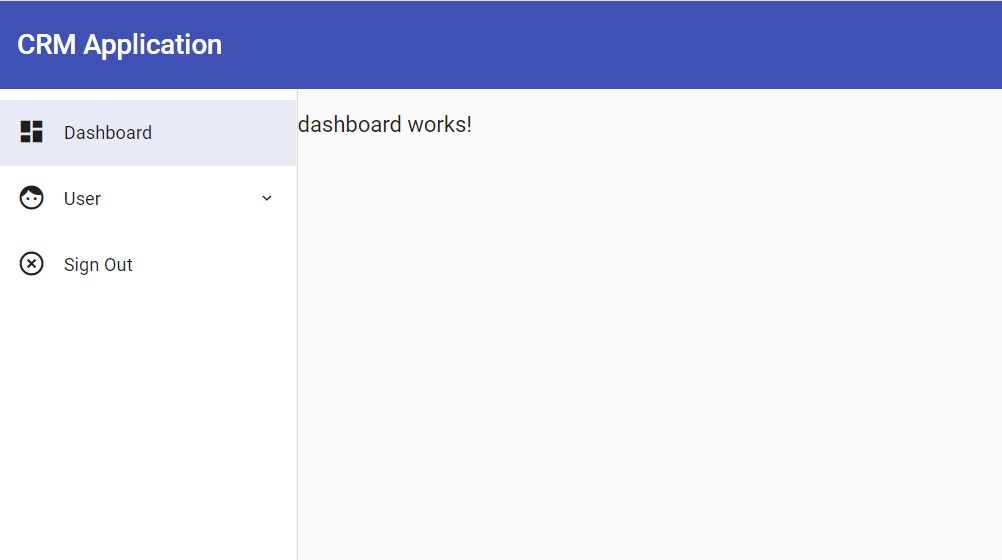
Once you do that, you should see this:

There you go! It logged you in successfully and forwarded you to the dashboard!
Click that Sign Out menu item and you'll go straight back to the login page.
Congratulations. You have made Smithers happy.
For today.
Wrapping It Up
This app is now your playground. Make some changes.
Test out different routes without guards to make sure that they work. As you can see, the login route already works.
Take a look at AuthenticationService as well. You might find some ways to optimize the code.
Remember, you can always grab the source for this branch on GitHub.
Have fun!
Photo by Etienne Girardet on Unsplash


