So you've got a great user interface (UI) you've developed with Angular and now you want it to "talk" to your Spring Boot REST service? That's easy to do.
In this guide, I'll go over how to set up a REpresentational State Transfer (REST) service with the Spring Boot framework. I'll also show how you can use Angular to connect to that REST service to retrieve data.
If you'd like to just get your hands dirty with some code, you have that option as well. Just grab the GitHub code for the Spring Boot application here. The Angular code is here.
Remember, though: if you're having problems running the Angular app locally, be sure to check the README.
Please note: this guide is a part of an ongoing series of tutorials on how to create a customer relationship management (CRM) application from scratch. The GitHub code for each guide belongs to a specific branch. The master branch holds the entire application up to the current date. If you want to follow the whole series just view the careydevelopmentcrm tag. Note that the website displays the guides in reverse chronological order so if you want to start from the beginning, go to the last page.
The Business Requirements
Your boss Smithers walks into your office and says he likes the work you've done so far with the CRM app. Now, he says, it's time to do some integration.
He wants you to get some code in place that can prove to him that your Angular app can communicate with a REST service developed with the Spring Boot framework.
Smithers says that you're required to use Spring Boot because that's what "everybody is doing these days."
He leaves your office before you have a chance to offer any comments.
Getting Started
If you've followed along with the first guide in this series, then you already have a bare-bones Angular app up and running. Sure, it doesn't do much of anything, but least it's there.
Now it's time to get a basic Spring Boot app deployed.
So you fire up Eclipse (or Spring Tool Suite) and get started from scratch.
Of course, you could use Spring Initializr but you're a real developer so you like to do all your own coding.
(You have fond memories of "the old days" when real programmers just used hexadecimal numbers to write code.)
Within Eclipse, create a Maven project so you can easily manage dependencies. Then, you update your POM file as follows:
<project xmlns="http://maven.apache.org/POM/4.0.0" xmlns:xsi="http://www.w3.org/2001/XMLSchema-instance" xsi:schemaLocation="http://maven.apache.org/POM/4.0.0 http://maven.apache.org/xsd/maven-4.0.0.xsd">
  <modelVersion>4.0.0</modelVersion>
  <groupId>com.careydevelopment.ecosystem.user</groupId>
  <artifactId>ecosystem-user-service</artifactId>
  <version>0.1.1-SNAPSHOT</version>

    <parent>
        <groupId>org.springframework.boot</groupId>
        <artifactId>spring-boot-starter-parent</artifactId>
        <version>2.1.0.RELEASE</version>
    </parent>

    <dependencies>
        <dependency>
            <groupId>org.springframework.boot</groupId>
            <artifactId>spring-boot-starter-web</artifactId>
        </dependency>
        <dependency>
            <groupId>org.apache.commons</groupId>
            <artifactId>commons-lang3</artifactId>
        </dependency>
    </dependencies>

    <properties>
        <java.version>1.8</java.version>
    </properties>

    <build>
        <plugins>
            <plugin>
                <groupId>org.springframework.boot</groupId>
                <artifactId>spring-boot-maven-plugin</artifactId>
            </plugin>
        </plugins>
        <finalName>${project.artifactId}</finalName>
    </build>
</project>
Let's go over the important parts of that file.
You can think of the groupId as a package name for Maven projects. In fact, I frequently use the base package of the application itself as the groupId in the POM file.
The artifactId is the name of the application itself.
So why is this quick-and-dirty test application named ecosystem-user-service? Because I'm foreshadowing a future lesson. Just roll with it.
Next, take a look at the <parent> stanza. That's necessary because you're creating a Spring Boot application. Nothing earth-shattering there.
Now check out the dependencies. There are only two of them.
You'll need spring-boot-starter-web because you're exposing endpoints that other applications can access via HTTP.
The other dependency, commons-lang3, is a nice-to-have because it offers some convenience classes that you'll undoubtedly need later on.
We're forward-looking around here.
If you look at the <properties> stanza you will see that you are, in fact, using Java 8. Maybe in a future lesson I'll go over how to upgrade to Java 11 but it's necessary at this point.
The <build> stanza enables you to create a deployable JAR file. The <finalName> element enables you to create the JAR file without a version number.
In other words, instead of creating a JAR file with this name:
ecosystem-user-service-0.1.1-SNAPSHOT.jar
It just creates a file with this name:
ecosystem-user-service.jar
So it makes your life easier when typing the file name on the command line.
The Model
When you test out the integration between Angular and Spring Boot, you have to return something from the Spring Boot REST service. So here's that thing you'll return:
public class Hello {

    private String hello = "world";
    private String foo = "bar";

    public String getHello() {
        return hello;
    }
    public void setHello(String hello) {
        this.hello = hello;
    }
    public String getFoo() {
        return foo;
    }
    public void setFoo(String foo) {
        this.foo = foo;
    }

    public String toString() {
        return ReflectionToStringBuilder.toString(this);
    }
}
Nothing particular striking there. It's a standard Java model.
As you can see, the values are hardcoded for now. The hello field returns "world" and the foo field returns "bar."
The code also includes getters and setters for each method.
That bit at the end justifies the rationale behind adding the commons-lang3 dependency in the POM file. It converts the object to a String and prints it out in a pretty format. That's pretty useful when you want to log a plain old Java object (POJO) and I recommend including it in all your Java models.
The Controller
Next, take a look at the controller class:
@RestController
public class HelloWorldController {

    @GetMapping("/helloworld")
    public Hello helloWorld() {
        return new Hello();
    }
}
That's pretty simple, too.
The @RestController annotation lives up to its name. It identifies the class as a controller that responds to REST requests via HTTP. It also returns those requests in JavaScript Object Notation (JSON) format.
The helloWorld() method responds to a REST request at a specific endpoint. It's annotated with @GetMapping because it responds to a GET request.
A GET request, by the way, the exact HTTP method your browser used to access this web page.
The endpoint for the GET request is defined in the parentheses next to the @GetMapping annotation. In this case, it's /helloWorld.
So if you deploy your Spring Boot application on your local machine so that it's listening on the default port of 8080, you can access the endpoint handled by this method at the following URL: http://localhost:8080/helloWorld.
The method itself does only one thing: it returns a new Hello object. That's the model class you created in the previous section.
In this case, though, Spring will marshall the object into JSON format it and send it back to the application that made the GET request.
The Application Class
This is Spring Boot, so you're going to need a class that bootstraps and launches this application. Here it is:
package com.careydevelopment.ecosystem.user;

import org.springframework.boot.SpringApplication;
import org.springframework.boot.autoconfigure.SpringBootApplication;

@SpringBootApplication
public class UserApplication {

    public static void main(String[] args) {
        SpringApplication.run(UserApplication.class,args);
    }
}
It's very important that you put this class in the base package of the entire application. That way, Spring can scan child packages for annotations.
Testing It Out
Yes, you can (and should) test out your Spring Boot service before you even touch the Angular app. That way you can make sure it's working properly.
To test it out, just right-click on the Spring Boot application class that you created in the previous section and select Run As... and Java Application from the context menu that appears.
Alternatively, you can right-click on the pom.xml file and select Run As... and Maven Build from the context menu that appears.
Then, enter clean package in the Goals field and click the Run button.
Once it's done building, open a command prompt and switch to the direcoty where ecosystem-user-service.jar is located.
Pro-tip: you can see where the jar file is located by looking at the "Replacing main artifact" line in your console.
Once you're in the right directory, just type this at the command prompt:
java -jar ecosystem-user-service.jar
Of course, that assumes you have the Java 8 runtime environment in your PATH.
Now that you have the application up and running, you can easily test it out.
Normally, you'd use something like Postman to test it. But because the endpoint here is nothing more than a simple GET request, you can use your browser.
Just point your browser to: http://localhost:8080/helloworld
You should see something like this:

Congratulations! The Spring Boot application is up and running!
On to Angular
What you've accomplished so far is only half the battle. Now it's time to invoke that REST call from your Angular app and get the same response you saw above.
So fire up your Microsoft Visual Studio editor and get busy.
The good news is that you can build on what you did in the previous guide. That makes sense because that's the whole point of having a series of guides, isn't it?
The first thing you're going to need to do is update the src/app/app.module.ts file. Specifically you need to add support for the HttpClientModule.
That makes sense because you're going to use HTTP to connect to the Spring Boot app.
Here's what the whole app.module.ts file should look like:
import { BrowserModule } from '@angular/platform-browser';
import { NgModule } from '@angular/core';
import { AppComponent } from './app.component';

import { HttpClientModule, HTTP_INTERCEPTORS } from '@angular/common/http';

@NgModule({
  declarations: [
      AppComponent
  ],
  imports: [
      BrowserModule,
      HttpClientModule
  ],
  providers: [],
  bootstrap: [AppComponent]
})
export class AppModule { }
Note the last import statement. That's where the code is importing HttpClientModule. It's also importing HTTP_INTERCEPTORS which I'll go over in a future guide.
But wait. What about that imports line farther down? Why does that also import HttpClientModule?
It's simple. The first import is just like a Java import line at the beginning of a .class file. It gives you easy access to the class but doesn't do anything.
The imports section actually makes the imported module available to the current module.
The Service
Next, it's time to create the service.
It's almost always the case that when you want to access a remote endpoint from within an Angular app, you'll do so with the aid of a service.
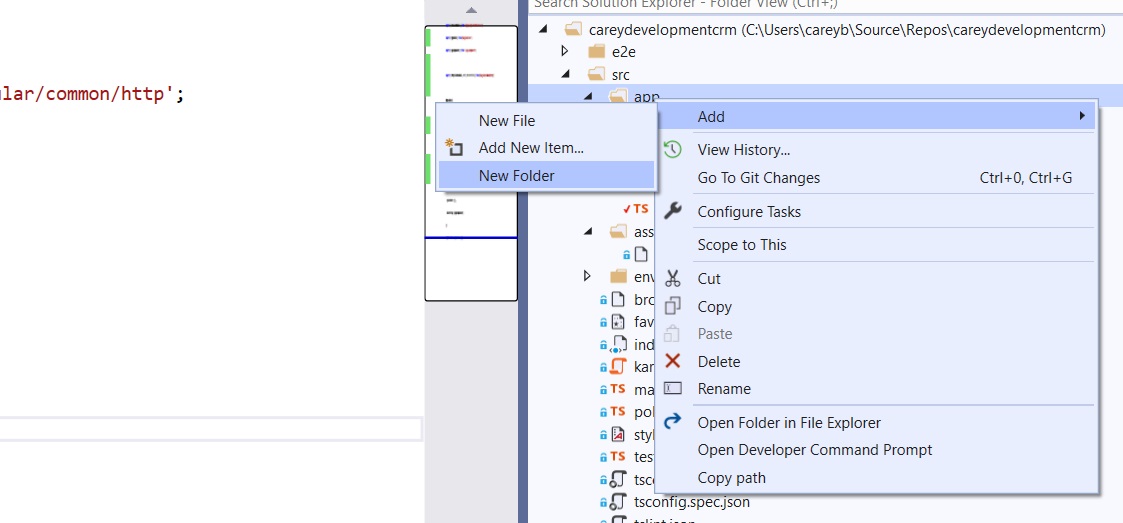
Start by creating a file. From within Microsoft Visual Studio, right click on the app subdirectory and click Add and New Folder.

Call the new folder services.
Now, right-click on the services folder you just created and select Add and New File.
Name the new file user.service.ts
Once you've added that file, it should appear in your editor.
Start by adding these two lines:
import { Injectable } from '@angular/core';
import { Observable } from 'rxjs';
import { HttpClient, HttpErrorResponse, HttpHeaders } from '@angular/common/http';
The first line enables you to inject the service as a dependency into other classes.
Just like Spring, Angular uses the dependency injection (DI) pattern so that classes get dependencies from other sources rather than creating those dependencies themselves.
Angular provides depdencies to classes once they're instantiated.
That word "provides" is in italics above because it's important.
You see, Angular's dependency injector needs to know "who" is providing the service to any classes that use it.
You'll see that Injectable class in action in just a moment.
Next, the code imports the Observable type. Now what the heck is that?
An Observable lives up to its name. In your code, you'll observe what it's doing by subscribing to it. Then, you can take action on it.
It's part of the Observer pattern that Angular implements spectacularly.
Why do you need an Observer for this service? Because you're making an asynchronous call.
You're going out to the network to invoke a GET request on a remote service. That will take some time.
The Observer will pay attention to what's going on with that request and process it when the remote application returns something. The Observer can also handle errors.
Now what about this rxjs thing? That's what you're importing Observable from, after all.
That's a library that you're going to quickly learn is your very best friend when it comes to handling asynchronous activity within an Angular app.
I'll delve more into rxjs types and operators in subsequent lessons.
The last import line gives us the necessary HTTP related classes to invoke actions on REST services.
Okay, let's cover the remainder of this service in one fell swoop:
@Injectable({ providedIn: 'root' })
export class UserService {

    constructor(private http: HttpClient) { }

    helloWorld(): Observable<any> {
        let url = "http://localhost:8080/helloworld";
        return this.http.get<any>(url);
    }
}
As promised, there's the reference to Injectable. This service annotates the class with the @Injectable decorator.
But what's that providedIn business? Remember: dependencies that get injected into objects need a provider.
Here, the service uses root as the provider. That means the service is available system-wide as a singleton.
Even better: if no other classes in the system use the service, it won't get included in the build.
By the way, that process of removing unused code from the build is called "tree-shaking." Remember that for the test.
Next, you might be wondering about that word export at the top of the class.
For now, you can think of that as something similar to public in Java. Simply put, it makes the class available to other classes throughout the application. There's a deeper meaning to it but it's not important here.
Next notice that the class uses a constructor. It's unimaginatively named "constructor."
In fact, that's the name of all Angular constructors.
You might be surprised to see that there's a parameter in the constructor. It's the HttpClient class that you imported earlier.
That, my friend, is a classic example of dependency injection. Angular will inject an instance of that class into your service so you don't have to worry about how to instantiate it.
Finally, the function itself. It's called helloWorld().
As you can see, the function returns an Observable. In fact, it returns an Observable of any type. That's why you see the <any> notation in the code.
The next line of code defines a URL as a string. That string looks pretty familiar, doesn't it? It's the same URL you used to access the service you created.
There's quite a bit going on in that return statement. I'll break it down.
First, it's using the this.http object. As you might have already guessed, this is a reference to an instance of this service class.
Recall that the code inserted the HttpClient object as a dependency in the constructor. If you look back at the constructor, you'll see that it gave that object the name http.
So this.http refers to that HttpClient instance.
The HttpClient object has a method called get(). You will be shocked to learn that it performs a GET request.
Also: note that the get() method accepts a typed response. The code uses <any> here so that it matches the type that's associated with the Observable instance that this method will return.
The get() method also accepts one parameter (at least in this case). That parameter is the URL of the endpoint.
Modifying the App Component
With the service completed, it's time to update the app.compoent.ts file. You can find it in the app directory. Just double-click on it to edit it.
The first thing you need to do is import the service so you can reference it. Do that with this line:
import { UserService } from './services/user.service';That imports the UserService class from the location in the source tree where you created it. Nothing fancy there.
Now, you need to create a constructor:
constructor(private userService: UserService) { }
What's going on there? If you answered "dependency injection" then pick up your prize at kissing booth!
Angular injects the UserService instance into this object as a private member with the name userService.
Next, let's put some code in that constructor.
    constructor(private userService: UserService) {
        let hello$ = userService.helloWorld();

        hello$.subscribe(
            (data: any) => console.log(data),
            err => console.error(err)
        );
    }
The first line grabs the Observable object returned by the service. It's a good idea to identify Observable variables with a $ sign at the end so that's why you see that here.
Now here's an important point: that let statement doesn't do anything!
Observable objects don't perform any actions until they get a subscription!
So if you're under the impression that the first line of code causes the application to access the REST service that you created earlier, you're wrong. That won't happen in that line.
It does, however, happen in the next line.
The hello$.subscribe() line subscribes to the Observable object and gets all the network stuff started.
That subscribe() function includes a couple of functions as a parameters. In other words, those aren't standard variables. They're snippets of code that each perform a function.
You might not have seen that a whole lot but get used to it. You'll see it quite a bit in Angular development.
The first function/parameter accepts as its input the data that's returned from the REST invocation. Remember, it can be any type of object which is why it's identified as any.
That function simply spits out the contents of the returned call to the console log.
The next function/parameter handles an error situation. In that case, it logs the error.
That's it. That's all that's needed at this point to integrate with the REST service.
Save all your work. And let's test this out.
Testing Time
For starters, make sure your Spring Boot application is up and running. See above.
Next, head over to a command prompt and launch your Angular app with this line:
ng serve
Next, go to your browser. For the purposes of these guides, I'll use a Google Chrome browser and advise you to do the same so it's easy to follow along.
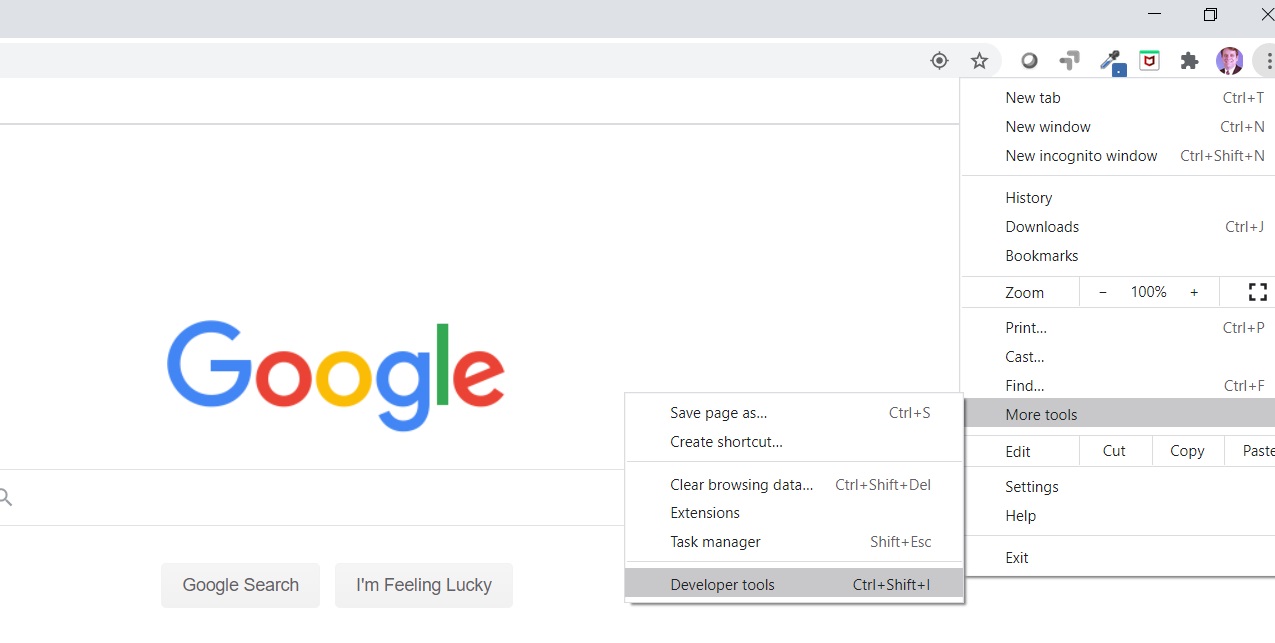
Before you visit the Angular app, open up a sidebar with Developer Tools.
You can do that by clicking on the three vertical dots in the upper, right-hand corner of the browser window and then selecting More tools and Developer tools from the menu that appears.

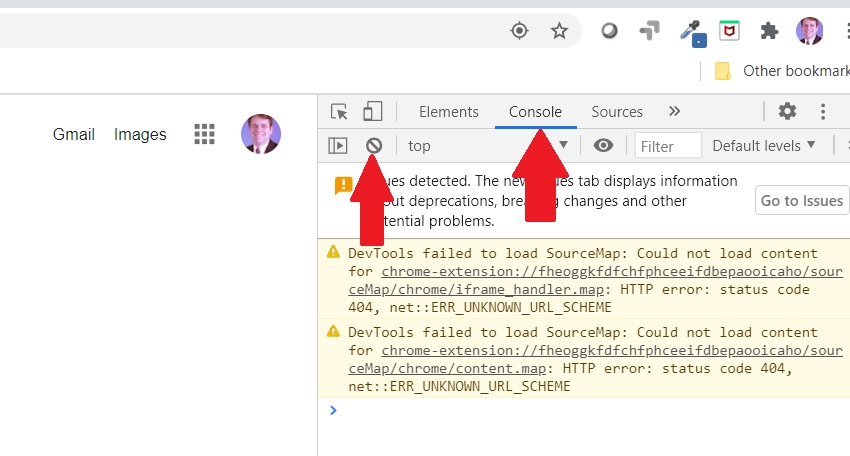
Now you should see a console in the sidebar. Make sure the Console tab is selected at the top.

Go ahead and click on what I call the "Don't icon" that the other arrow is pointing to. It will clear your console.
Now, point your browser to http://localhost:4200
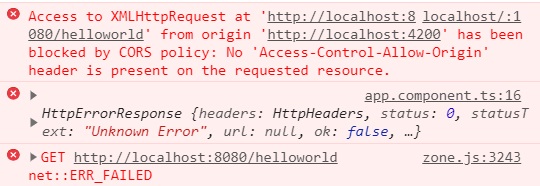
And now check your console to see that everything worked perfectl-
Wait. Something's wrong!

What's going on there?
Well, for starters, you can see that error logging is working. So there's some good news.
But the connection isn't working. Fortunately, it's easy to fix.
The problem here is that the REST service is blocking cross-origin requests. That's for security purposes.
I'll get into that subject more at a later date. For now, just go with the quick and dirty solution.
Stop your Spring Boot application. Add a @CrossOrigin annotation to the top of the HelloWorldController class. The whole class should like this:
@RestController
@CrossOrigin
public class HelloWorldController {

    @GetMapping("/helloworld")
    public Hello helloWorld() {
        return new Hello();
    }
}
Now restart the Spring Boot application.
Go back to your browser. Click on the "Don't icon" once again to clear the console. Then refresh the page by simply hitting the Enter key in the URL bar. You can also hit F5.
Now check the console and you should see this:

Congratulations! You've successfully integrated your Angular app with Spring Boot!
Wrapping It Up
Okay. Time for you to get your hands dirty. Start making some changes on both sides of the code and see what happens.
For example: try a POST request. Or a PUT request.
Or maybe you can create a model on the Angular side so you don't have to use any for the return type.
As is always the case, you can grab the latest code on GitHub. The Angular branch is here and the Spring Boot branch is here.
Have fun!
Photo by Andrea Piacquadio from Pexels


