Need to expose a REST API endpoint that accepts file uploads?
Excellent news: you can do that with Spring Boot. And in this guide, I'll show you how it's done.
Even better: I'll show you how to test your solution with Postman.
The Use Case
For this example, the business requirement is to allow users to upload their profile images. They'll choose the file to upload via a UI (Angular, Bootstrap, etc.). The client-side code will invoke the Spring Boot REST service that you'll create here.
Of course, you'll need to have a system in place that allows your Spring Boot application to write files to the underlying operating system.
Or, if you're using a containerized solution, you'll need to persist those files so they survive a container restart. That's an out-of-scope requirement for this guide.
The Directory Structure
For this example, the directory structure that holds user profile photos looks like this:
/etc/application/users/{userId}/profileWhere {userId} is the user's ID. That's fairly intuitive.
As of now, the user can upload one (1) and only one (1) photo at a time. So the application will mercilessly blow away everything in that directory when the user uploads a new profile photo.
Utility Methods
Now let's look at some utility methods that handle file I/O.
Full disclosure: you can skip this section if you want to just get straight to the part where you see how to upload a file via Spring controller. But you may need to come back here when you want to know how to write a MultipartFile object to disk.
First up is getRootLocationForUserUpload().
public String getRootLocationForUserUpload(String userId) {
    if (StringUtils.isEmpty(userId)) throw new IllegalArgumentException("No user id!");

    StringBuilder builder = new StringBuilder();

    builder.append(userFilesBasePath);
    builder.append("/");
    builder.append(userId);

    String location = builder.toString();

    createDirectoryIfItDoesntExist(location);

    return location;
}
That's going to return the path to base user directory as a String object. That structure will look like this:
/etc/application/users/{userId}In other words, that's everything except the /profile directory.
By the way, that createDirectoryIfItDoesntExist() method looks like this:
protected void createDirectoryIfItDoesntExist(String dir) {
    final Path path = Paths.get(dir);

    if (Files.notExists(path)) {
        try {
            Files.createDirectories(path);
        } catch (IOException ie) {
            LOG.error("Problem creating directory " + dir);
        }
    }
}
That's necessary because the user may be uploading a profile photo for the first time. In that case, the application will need to create the directory on the fly.
Here's an overloaded utility method:
public String getRootLocationForUserProfileImageUpload(String userId) {
    if (StringUtils.isEmpty(userId))
        throw new IllegalArgumentException("No user id!");

    String base = getRootLocationForUserUpload(userId);

    StringBuilder builder = new StringBuilder(base);
    builder.append("/");
    builder.append(PROFILE_DIR);

    String location = builder.toString();

    createDirectoryIfItDoesntExist(location);

    return location;
}

public String getRootLocationForUserProfileImageUpload(User user) {
    if (user == null)
        throw new IllegalArgumentException("No user provided!");
    return this.getRootLocationForUserProfileImageUpload(user.getId());
}
The first method accepts user ID. The second method accepts a User object.
But they both accomplish the same thing: the get the user's profile directory.
That's the directory returned by getRootLocationForUserUpload() but with /profile appended to it.
Here are a few validation methods:
protected void validateFile(MultipartFile file, Long maxFileUploadSize)
        throws MissingFileException, FileTooLargeException {
    checkFileExistence(file);
    checkFileSize(file, maxFileUploadSize);
}

private void checkFileSize(MultipartFile file, Long maxFileUploadSize) throws FileTooLargeException {
    if (file.getSize() > maxFileUploadSize) {
        String message = "File is too large - max size is " + maxFileUploadSize;
        throw new FileTooLargeException(message);
    }
}

private void checkFileExistence(MultipartFile file) throws MissingFileException {
    if (file == null)
        throw new MissingFileException("No file sent!");
    if (StringUtils.isEmpty(file.getName()))
        throw new MissingFileException("No file sent!");
}
Those methods make sure that the file exists and that it's not too large.
How do I define "too large"? In this case, it's 500k. But you can set it to whatever value you want.
And here's the method that deletes all files in the directory:
protected void deleteAllFilesInDirectory(Path rootLocation) {
    try (DirectoryStream<Path> directoryStream = Files.newDirectoryStream(rootLocation)) {
        directoryStream.forEach(path -> {
            path.toFile().delete();
        });
    } catch (IOException ie) {
        LOG.error("Problem trying to delete files in " + rootLocation.toString());
    }
}
Here's the method that actually saves the file to disk:
private void saveFile(MultipartFile file, User user, Path rootLocation) throws CopyFileException {
    String newFileName = getNewFileName(file, user);

    try (InputStream is = file.getInputStream()) {
        Files.copy(is, rootLocation.resolve(newFileName));
    } catch (IOException ie) {
        LOG.error("Problem uploading file!", ie);
        throw new CopyFileException("Failed to upload!");
    }
}
You don't have to include the getNewFileName() method if you don't want to. It's a method that takes the incoming file and gives it a new name instead of whatever name the user gave it.
I do that so all files are prepended with the user ID. Makes it easier to find that user's files.
All the heavy lifting up there happens in Files.copy(). That's where it takes the InputStream from the MultipartFile and writes it to disk.
But what directory does it use? It uses the rootLocation that gets passed in and appends the file name to it. That's the resolve() method you see above.
Finally, here's the method that takes a MultipartFile object and saves it to the operating system.
public void saveProfilePhoto(MultipartFile file, User user)
        throws MissingFileException, FileTooLargeException, CopyFileException {
    validateFile(file, maxFileUploadSize);
    Path rootLocation = Paths.get(getRootLocationForUserProfileImageUpload(user));
    LOG.debug("Root location is " + rootLocation);

    deleteAllFilesInDirectory(rootLocation);
    saveFile(file, user, rootLocation);
}
You've already seen all the methods referenced in there.
Next, let's look at some Spring stuff.
Spring Stuff
Here's a simple controller method that accepts a MultipartFile and uses the code above to save it to the hard drive.
@PostMapping("/profileImage")
public ResponseEntity<?> saveProfileImage(@RequestParam("file") MultipartFile file) {
    User user = sessionUtil.getCurrentUser();
    LOG.debug("User uploading is " + user);

    try {
        fileUtil.saveProfilePhoto(file, user);

        return ResponseEntity.status(HttpStatus.CREATED).body("Profile image uploaded successfully!");
    } catch (FileTooLargeException fe) {
        return ResponseEntity.status(HttpStatus.UNPROCESSABLE_ENTITY).body("File too large");
    } catch (MissingFileException me) {
        return ResponseEntity.status(HttpStatus.BAD_REQUEST).body("Missing file");
    } catch (Exception e) {
        return ResponseEntity.status(HttpStatus.INTERNAL_SERVER_ERROR).body("Unexpected error");
    }
}
The @PostMapping annotation indicates that the endpoint accepts an HTTP POST method. That makes sense because POST is synonomous with creating something and this method is used to create a new file.
The endpoint is /profileImage.
The method accepts a single parameter: a MultipartFile object that's brought in as a request parameter named "file."
The whole concept of a multi-part file, by the way, is that it's part of a multi-part request that pieces together different types of data and sends it all in a single request.
One of the data types you can send in a multi-part request is a file. Hence the name: multi-part file.
Anyhoo, that MultipartFile is the only piece of data that comes in at this endpoint.
So how does the application "know" whose profile photo it is? That's easy: it just gets the current user based on the JWT passed in.
That's what you see in the first line with this code:
User user = sessionUtil.getCurrentUser();If you're not using JWT, you can pass in the user ID as a separate request parameter.
After that, the method invokes the saveProfilePhoto() method that you saw in the previous section to write the file contents to the hard drive.
It's no more complicated than that.
I'll eventually refactor the code above so that all those catch blocks are handled with @ExceptionHandler. But this works for now.
Testing Time
Now it's time to test this beast with Postman.
Start by launching the Spring Boot application that handles the profile image upload. Then launch Postman.
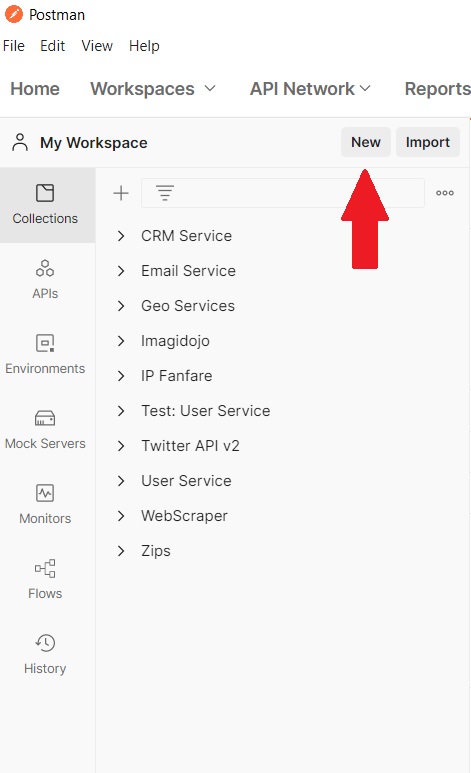
In Postman create a new request by clicking the New button on the top part of the sidebar and selecting HTTP Request from the popup that appears.

You can put the request in a collection later. If that's how you roll.
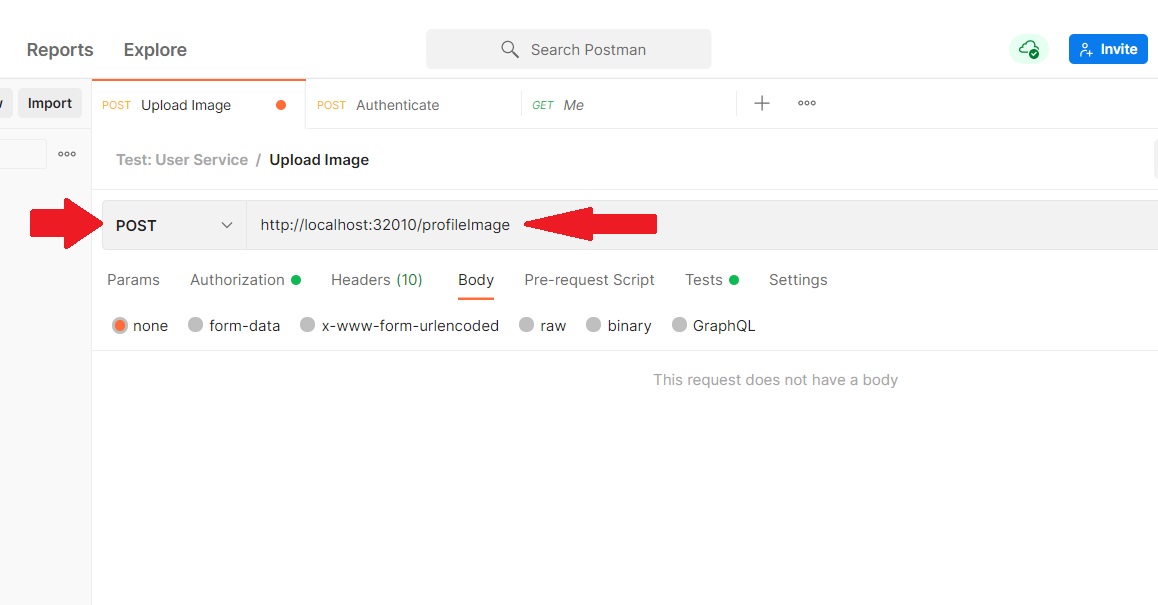
Set the request method to POST and enter the URL of your REST API endpoint that handle image uploads.

Please note that your URL might differ from mine. As you can see, I'm listening on port 32010. That's almost certainly not the port you're listening on.
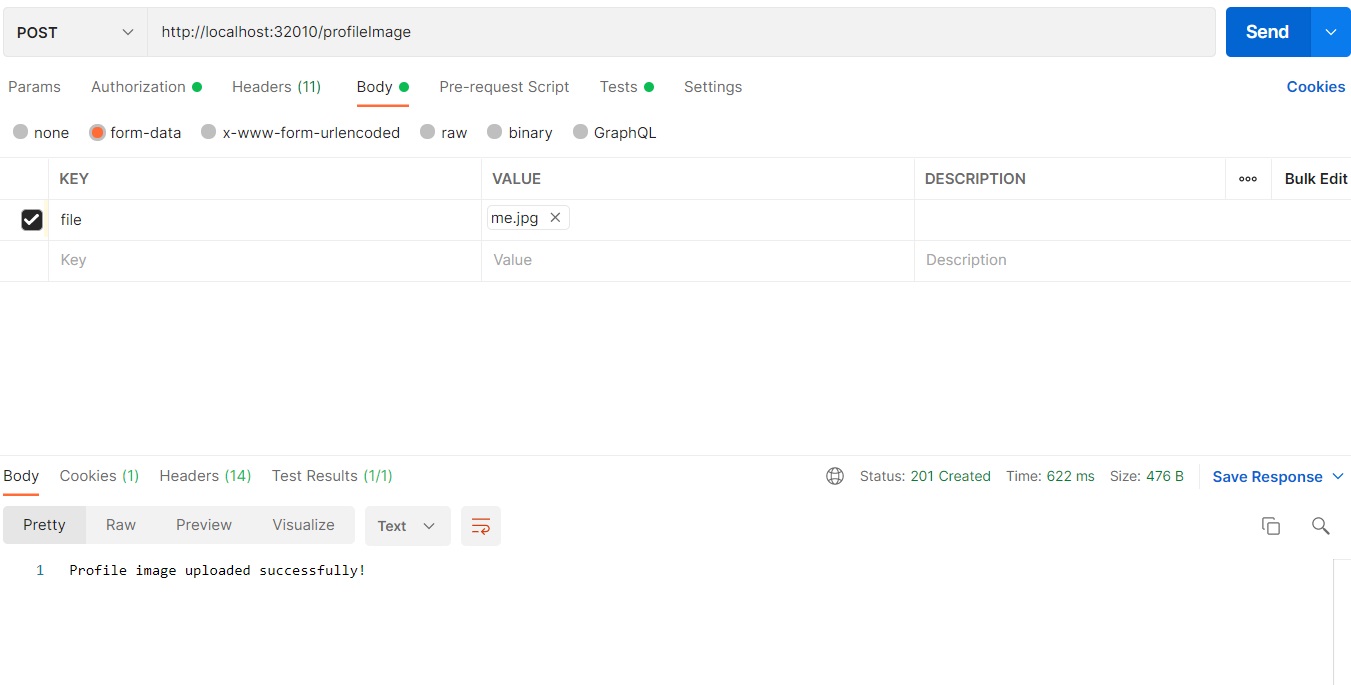
Select form-data in the Body tab.

Now, in the first row under Key, hover your mouse over the right-hand side of the first column. You should see a drop-down that lets you choose between Text and File.
Choose File.

Name the key "file". Then click the Select Files button to choose the file you'd like to upload.

If you need to add a JWT, use the Authorization tab to do that.
Now click the blue Send button in the upper, right-hand corner and let 'er rip.
Here's what I got back:

And that's exactly what I'd expect with the code above.
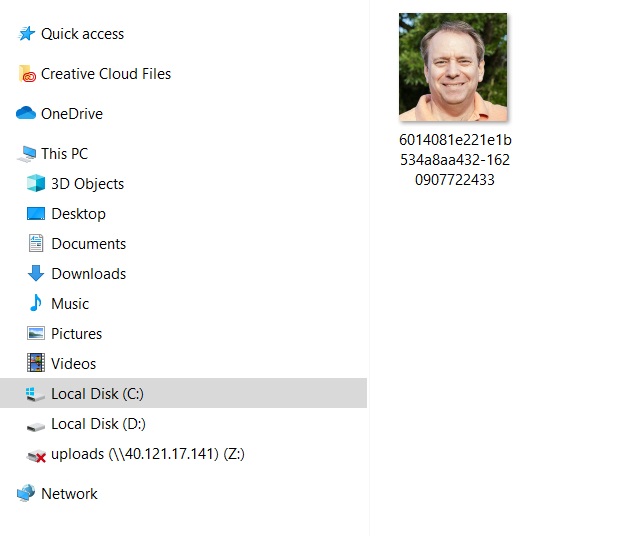
Now if I check file system, I'll see my image there:

Yep. That's what I uploaded.
Wrapping It Up
Now you know how to upload a file using a Spring Boot REST API.
Over to you. Take what you've learned here and work it into your own code. Make the adjustments to suit your own business requirements and tweak the methods accordingly.
Have fun!
Photo by Ono Kosuki from Pexels


