Need a table that displays dynamic content? Angular Material has a component for that.
It's imaginatively called a "table."
In this guide, I'll show you how to use that table component to display data. I'll also show you how to code it so that users can sort the contents.
And yes, we got pagination in here too.
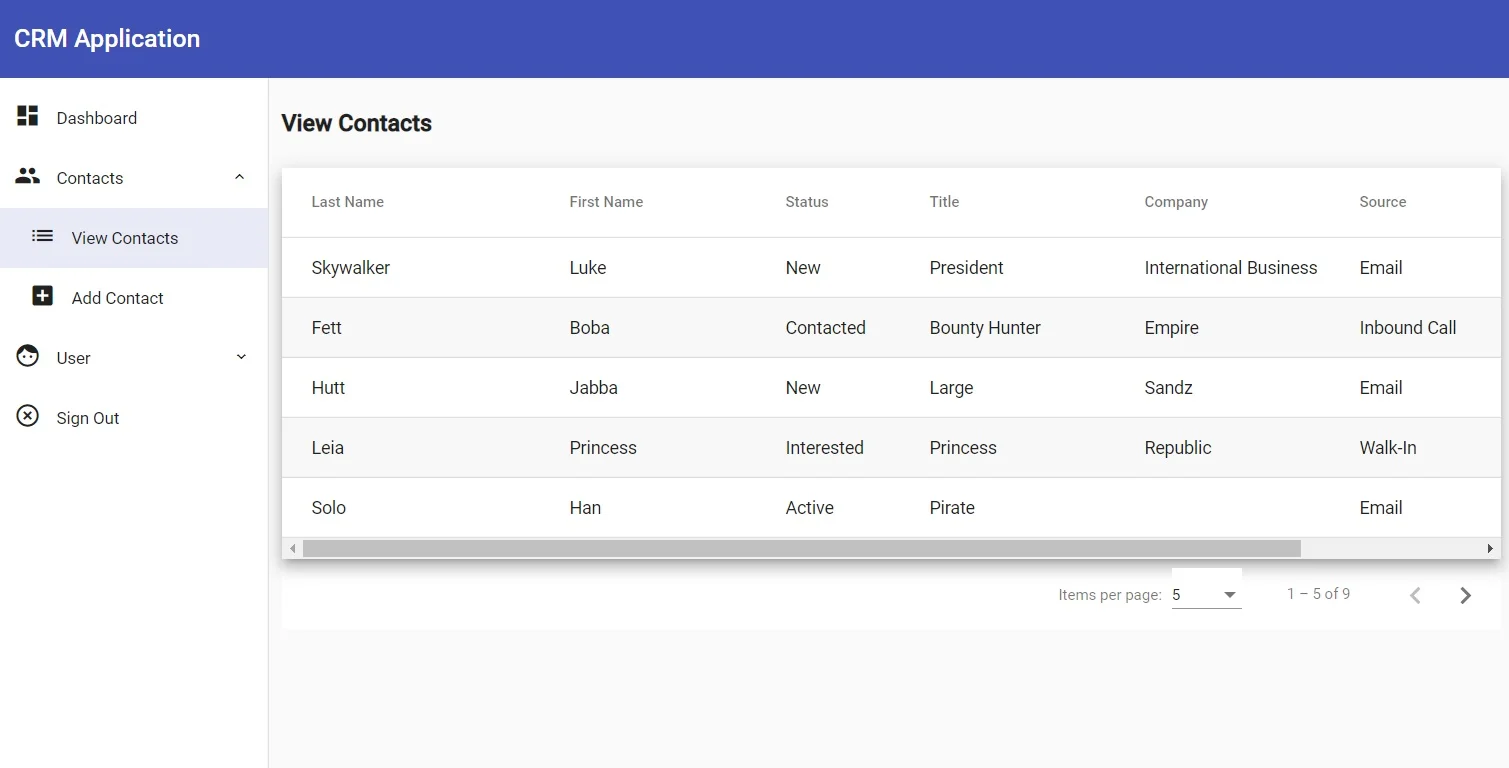
So when the whole thing is done, you'll have a slick table that looks like this:

If that's what you're interested in, follow along here. Alternatively, just go grab the code from GitHub.
Remember: if you're having problems running the Angular app locally, be sure to check the README.
Please note: this guide is a part of an ongoing series of tutorials on how to create a customer relationship management (CRM) application from scratch. The GitHub code for each guide belongs to a specific branch. The master branch holds the entire application up to the current date. If you want to follow the whole series, just view the careydevelopmentcrm tag. Note that the website displays the guides in reverse chronological order so if you want to start from the beginning, go to the last page.
The Business Requirements
Your boss Smithers walks into your office. Before you can even say "hi," he starts talking.
"In that CRM app you're working on, there's currently no way to display people's contacts! What good is a CRM that doesn't show contacts?!?"
You can tell he's happier than he sounds. That speed-dating event he went to last night must have gone well.
"I need you to put in a screen that shows all the contacts that people put into the system," Smithers says. "Let's make that happen, mmmkay?"
Then he walks out.
Server Side Order
You can safely skip this section if you're just here for the UI part of displaying a table. This part of the guide is for people who've been following the series about creating a CRM from scratch.
The first thing you need to do is update your Spring Boot contact service to retrieve all contacts by sales owner. That ain't too difficult at all.
In the source code for the service, update the repository interface. Add this new method:
public List<Contact> findBySalesOwnerUsername(String username);That's pretty easy, huh? You don't even have to implement the method.
The name of that method, by the way, gives the game away. And the framework is smart enough to parse that method name and create a query that does exactly that.
In other words, findBySalesOwnerUserName() returns a list of Contact objects with a sales owner whose username matches the provided username.
Now, update the controller. Once again, just add a single method:
    @GetMapping("")
    public ResponseEntity<?> fetchContacts() {
        Authentication authentication = SecurityContextHolder.getContext().getAuthentication();
        String username = (String)authentication.getPrincipal();

        LOG.debug("Fetching all contacts for " + username);

        if (!StringUtils.isBlank(username)) {
            List<Contact> contacts = contactRepository.findBySalesOwnerUsername(username);
            return ResponseEntity.ok(contacts);
        }

        return ResponseEntity.status(HttpStatus.NOT_FOUND).build();
    }
First, note that @GetMapping is an empty string. That means the endpoint applies to the path specified in @RequestMapping at the beginning of the class.
In this case, that's /contact
So any time someone invokes a GET request on /contact, this is the method that will fulfill the request.
And what does it do? It determines who the user is and gets the username. Then, it uses that username when it calls the repository method you just looked at.
If you're wondering how it knows who the user is, recall that all requests here must include a JSON web token. That web token includes the some important info about the user, such as (wait for it) the username.
The controller gets that info from SecurityContext.
Once the controller has a list of all contacts, it returns the list to the calling client.
Modifying With Modules
Okay, now it's time to make updates on the Angular side of the house.
Start by going to your command line and navigating to the root of your CRM source code. Then, enter this command:
ng g c featuers/contacts/view-contacts
That's going to create the component that shows the table you saw in the intro.
Now, get thee back into Microsoft Visual Studio and modify contacts.module.ts. Add three new modules:
- MatTableModule
- MatPaginatorModule
- MatSortModule
Those are the three modules you'll need to create your table and support sorting/pagination. You can check out the link above to see exactly how they get imported.
By the way, that ViewContactsComponent class you just created should also be imported in that module. If not, go ahead and add it (but the command line tool probably took care of that for you).
And while you're here, don't forget to add a new route to get to a "View Contacts" page:
export const routes = [
  { path: '', pathMatch: 'full', redirectTo: 'add-contact' },
  { path: 'add-contact', component: AddContactComponent },
  { path: 'edit-contact', component: EditContactComponent },
  { path: 'view-contacts', component: ViewContactsComponent }
];
Going out in Style
Next, add a little bit of styling to your as-of-yet unborn table.
Edit view-contacts.component.css. Make it look like this:
table {
  width: 1150px;
}

.example-container {
  width: 100%;
  max-width: 100%;
  overflow: auto;
}

.mat-row:nth-child(even) {
  background-color: #F8F8F8;
}

.mat-row:nth-child(odd) {
  background-color: #FFFFFF;
}
The first thing you should notice about that CSS is that the table will take up 1,150 pixels. And you might be thinking to yourself, "How is that possible on a smartphone?"
It's a good question. Remember, part of the requirements of this app is that it must work on a mobile platform because mobile is everything.
And here's the answer: the simple fact is that to get anything useful into the table you'd either have to implement multi-row rows or let users just scroll to the right to see everything in a single row.
For this solution, I think it's best to use the "swipe right" solution. Yeah, just like on Tinder.
So people on smartphones will need to scroll to the right to see everything on a single row. That means you won't need to do any Angular Flex-Layout work in the HTML part of the code.
That example-container class you see defined above will apply to the element that holds the table. The overflow: auto part will create the horizontal scrollbar so people viewing the table on small devices can swipe right.
The last two classes color odd/even rows white and light-gray, respectively. That makes it easier for users to follow along within a single row.
Typing Some Script
Next, edit view-contacts.component.ts. Make it look like this:
import { Component, OnInit, ViewChild, ViewEncapsulation } from '@angular/core';
import { MatPaginator } from '@angular/material/paginator';
import { MatSort } from '@angular/material/sort';
import { MatTableDataSource } from '@angular/material/table';
import { User } from '../../../models/user';
import { AlertService } from '../../../ui/alert/alert.service';
import { ContactService } from '../../service/contact.service';
import { UserService } from '../../service/user.service';
import { Contact } from '../models/contact';
import { DropdownOption } from '../../ui/model/dropdown-option';
import { addressTypes } from '../constants/address-type';
import { contactStatuses } from '../constants/contact-status';
import { linesOfBusiness } from '../constants/line-of-business';
import { phoneTypes } from '../constants/phone-type';
import { sources } from '../constants/source';
import { DropdownService } from '../../ui/service/dropdown.service';


@Component({
  selector: 'app-view-contacts',
  templateUrl: './view-contacts.component.html',
  styleUrls: ['./view-contacts.component.css']
})
export class ViewContactsComponent implements OnInit {

  displayedColumns: string[] = ['lastName', 'firstName', 'status', 'title', 'company', 'source'];
  dataSource: MatTableDataSource<Contact>;
  currentUser: User;
  dataLoading: boolean = true;

  availableAddressTypes: DropdownOption[] = addressTypes;
  availablePhoneTypes: DropdownOption[] = phoneTypes;
  availableContactStatuses: DropdownOption[] = contactStatuses;
  availableLinesOfBusiness: DropdownOption[] = linesOfBusiness;
  availableSources: DropdownOption[] = sources;

  @ViewChild(MatPaginator) paginator: MatPaginator;
  @ViewChild(MatSort) sort: MatSort;

  constructor(private userService: UserService, private contactService: ContactService,
    private alertService: AlertService, private dropdownService: DropdownService) {
  }

  ngOnInit(): void {
    this.currentUser = this.userService.user;
    this.loadContacts();
  }

  private loadContacts() {
    if (this.currentUser) {
      this.contactService.fetchMyContacts()
        .subscribe(
          (contacts: Contact[]) => this.handleContacts(contacts),
          err => this.handleContactsError(err)
        );
    } else {
      this.alertService.error("Problem identifying user!");
      this.dataLoading = false;
    }
  }

  private handleContacts(contacts: Contact[]) {
    this.dataLoading = false;
    this.dataSource = new MatTableDataSource(contacts);
    this.dataSource.paginator = this.paginator;
    this.dataSource.sort = this.sort;
  }

  private handleContactsError(err) {
    console.error(err);
    this.alertService.error("Problem loading contacts!");
  }
}
A lot to cover there. Let's start with the fields at the top.
The displayColumns array specifies the columns that will appear in the table. They get mapped in the HTML, but I think it's a good idea to give the identifiers in this array the same names as the properties in the object itself.
In other words, the "lastName" string in the array lines up with the lastName property in Contact, the "firstName" string lines up with firstName in Contact, and so on.
Next up is the data source. It's specified as a MatTableDataSource that's stereotyped to Contact. That makes perfect sense because the table will display a list of contacts.
The currentUser boolean identifies the current user of the application.
The dataLoading boolean return true if the application is still in the process of going out to the service to get the user's contacts. Otherwise, it's false.
The next five arrays identify all possible values for specific dropdowns (status, source, etc.). They're needed here because the component needs to lookup a display value (for example, "Dev Ops") from a stored value (for example, "DEV_OPS"). It's a way to keep things pretty on the UI.
The next fields identify child components for pagination and sorting, respectively.
The ngOnInit() runs when the component gets loaded. At that time, it grabs the current User object stored in UserService. Then, it fetches all the contacts for that user.
That last part is handled in the loadContacts() method.
The handleContacts() method gets run once the contacts have been loaded from the back end. It constructs the data source and sets up pagination and sorting.
If the component hits an error when trying to fetch the contacts, it will follow the logic in the handleContactsError() method.
Marking Up Some Text
Now, edit view-contacts.component.html. Make it look like this:
<div class="route-content">
  <div>
    <h4>View Contacts</h4>
  </div>
  <div style="margin-bottom:20px">
    <alert></alert>
  </div>
  <div class="absolute-center" *ngIf="dataLoading">
    <mat-spinner [diameter]="80"></mat-spinner>
  </div>
  <div [style.visibility]="dataLoading ? 'hidden' : 'visible'">
    <div class="example-container mat-elevation-z8">
      <table mat-table [dataSource]="dataSource" matSort>

        <ng-container matColumnDef="lastName">
          <tr><th mat-header-cell *matHeaderCellDef mat-sort-header> Last Name </th></tr>
          <tr><td mat-cell *matCellDef="let row" style="width:20%"> {{row.lastName}} </td><tr>
        </ng-container>

        <ng-container matColumnDef="firstName">
          <tr><th mat-header-cell *matHeaderCellDef mat-sort-header> First Name </th></tr>
          <tr><td mat-cell *matCellDef="let row" style="width:15%"> {{row.firstName}} </td></tr>
        </ng-container>

        <ng-container matColumnDef="status">
          <tr><th mat-header-cell *matHeaderCellDef mat-sort-header style="width:500px"> Status </th></tr>
          <tr>
            <td mat-cell *matCellDef="let row" style="width:10%">
              {{dropdownService.getDisplay(row.status, availableContactStatuses)}}
            </td>
          </tr>
        </ng-container>

        <ng-container matColumnDef="title">
          <tr><th mat-header-cell *matHeaderCellDef mat-sort-header style="width:500px"> Title </th></tr>
          <tr><td mat-cell *matCellDef="let row" style="width:15%"> {{row.title}} </td></tr>
        </ng-container>

        <ng-container matColumnDef="company">
          <tr><th mat-header-cell *matHeaderCellDef mat-sort-header style="width:500px"> Company </th></tr>
          <tr><td mat-cell *matCellDef="let row" style="width:15%"> {{row.company}} </td></tr>
        </ng-container>

        <ng-container matColumnDef="source">
          <tr><th mat-header-cell *matHeaderCellDef mat-sort-header> Source </th></tr>
          <tr>
            <td mat-cell *matCellDef="let row" [style.color]="row.color" style="width:25%">
              {{dropdownService.getDisplay(row.source, availableSources)}}
            </td>
          </tr>
        </ng-container>

        <tr mat-header-row *matHeaderRowDef="displayedColumns"></tr>
        <tr mat-row *matRowDef="let row; columns: displayedColumns;"></tr>
      </table>
    </div>
    <mat-paginator [pageSizeOptions]="[5, 10, 25, 100]"></mat-paginator>
  </div>
</div>
I've already covered spinners and alerts in the past, so I won't rehash those parts here. Let's start with this line:
<div [style.visibility]="dataLoading ? 'hidden' : 'visible'">That's a bit of a hack, actually.
What's going on there is this: the code hides the table while the data is loaded from the back end. During that time, the spinner appears.
But you might notice that it's not using trusty ol' *ngIf. Why is that?
That's the hack. For this solution, the table needs to be there, just not visible. That's so Angular Material can work its magic as it relates to pagination.
If you use *ngIf, the table isn't there at all and you won't end up with the desired results.
Also, you might notice that the code uses <table mat-table> instead of just plain <mat-table>. That's fine because this code isn't using flex.
The [dataSource] attribute you see in the <table> element identifies the data source that you saw in the previous section.
Within that <table> element, you'll see several <ng-container> elements. They all follow the same pattern so I'll just cover one of them.
If you're unfamiliar with <ng-container>, it's a structural directive. That means it affects what gets shown to users on the screen.
Usually, you can apply structural directives within "normal" HTML elements, like <div>.
But sometimes you can't.
And so <ng-container> was born. It covers those instances when you just need an enclosing element that functions with a structural directive.
The <ng-container> here identifies a column within the table. You see six of them because there are six columns.
The matColumnDef attribute references a string value from the displayedColumns array you looked at in the last section.
Then, the block of HTML maps a header (for example, "Last Name") with the value that will appear in the cells below it.
The variable row that you see all over the place in that code lives up to its name. It represent a single row in the table. It also represent a single instance of Contact.
So row has all the same properties as Contact. That's why it's important to stereotype the MatTableDataSource object.
Next, take a look at those two <tr> elements towards the bottom of the <table> block.
The first one associates the headers with the displayedColumns array you saw in the last section.
The second <tr> iterates through each of the contacts returned by the Spring Boot service and displays a new row for each one.
Finally, <mat-paginator> is all you need to create pagination for this requirement. That's just another way that Angular Material makes your life way too easy.
What's on the Menu
You can't forget to add a menu item so users can easily navigate to this lovely new page you've just created.
Edit menu.ts and add a new "View Contacts" item. The whole thing should look like this:
import { NavItem } from './nav-item';

export let menu: NavItem[] = [
  {
    displayName: 'Dashboard',
    iconName: 'dashboard',
    route: 'dashboard'
  },
  {
    displayName: 'Contacts',
    iconName: 'group',
    route: 'contacts',
    children: [
      {
        displayName: 'View Contacts',
        iconName: 'list',
        route: 'contacts/view-contacts'
      },
      {
        displayName: 'Add Contact',
        iconName: 'add_box',
        route: 'contacts/add-contact'
      }
    ]
  },
  {
    displayName: 'User',
    iconName: 'face',
    route: 'user',
    children: [
      {
        displayName: 'Account Info',
        iconName: 'account_box',
        route: 'user/account-info'
      },
      {
        displayName: 'Profile Image',
        iconName: 'image',
        route: 'user/profile-image'
      }
    ]
  },
  {
      displayName: 'Sign Out',
      iconName: 'highlight_off'
  }
];
But... Really?
Yep. That's it.
Now let's find out if this thing works.
Start up your Spring Boot applications: the user service and the contact service.
Next, head over to your command line and launch the Angular app. Then, navigate to http://localhost:4200/login and login with the usual credentials (darth/thedarkside).
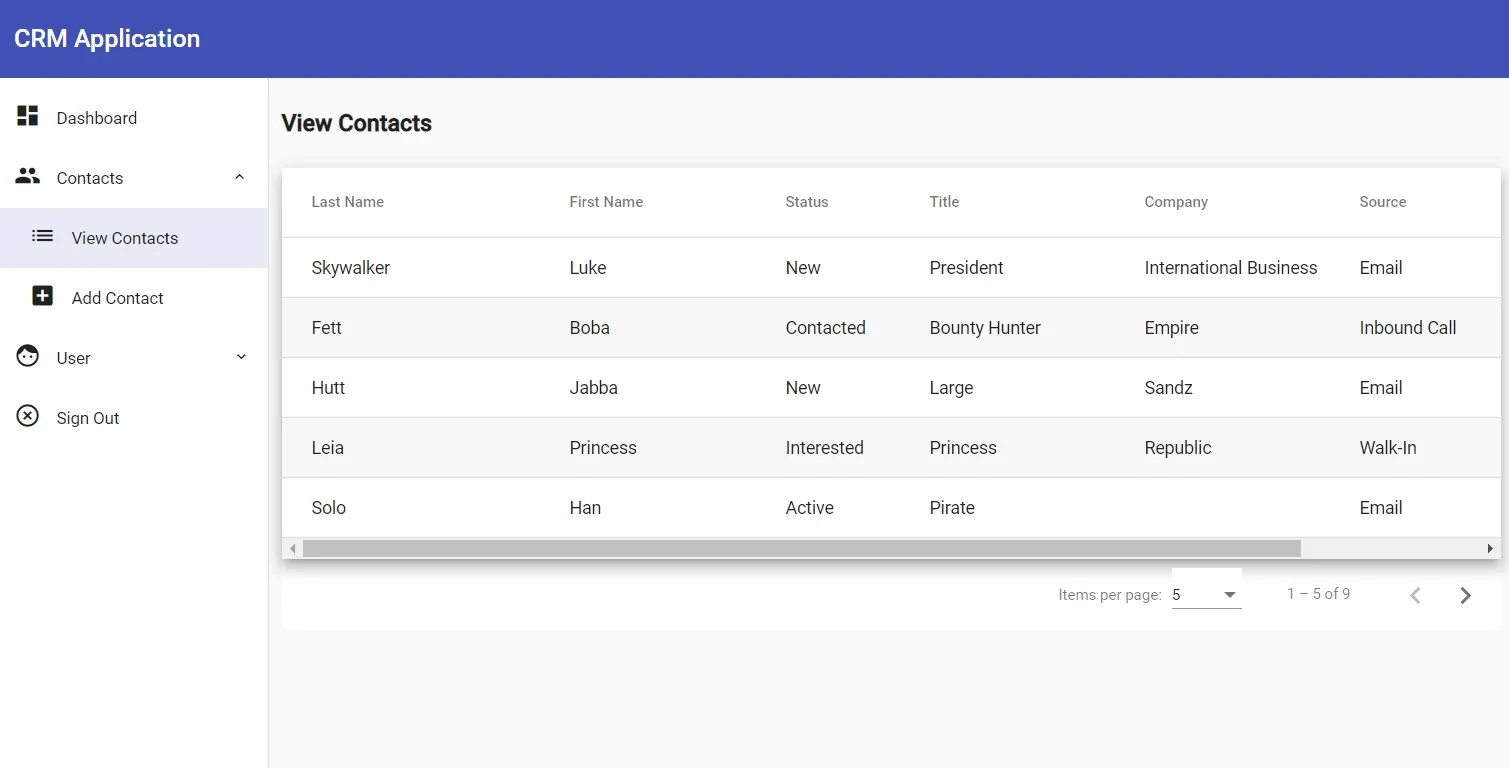
Now navigate to Contacts and View Contacts on the left-hand sidebar. If everything went smoothly, you should see this:

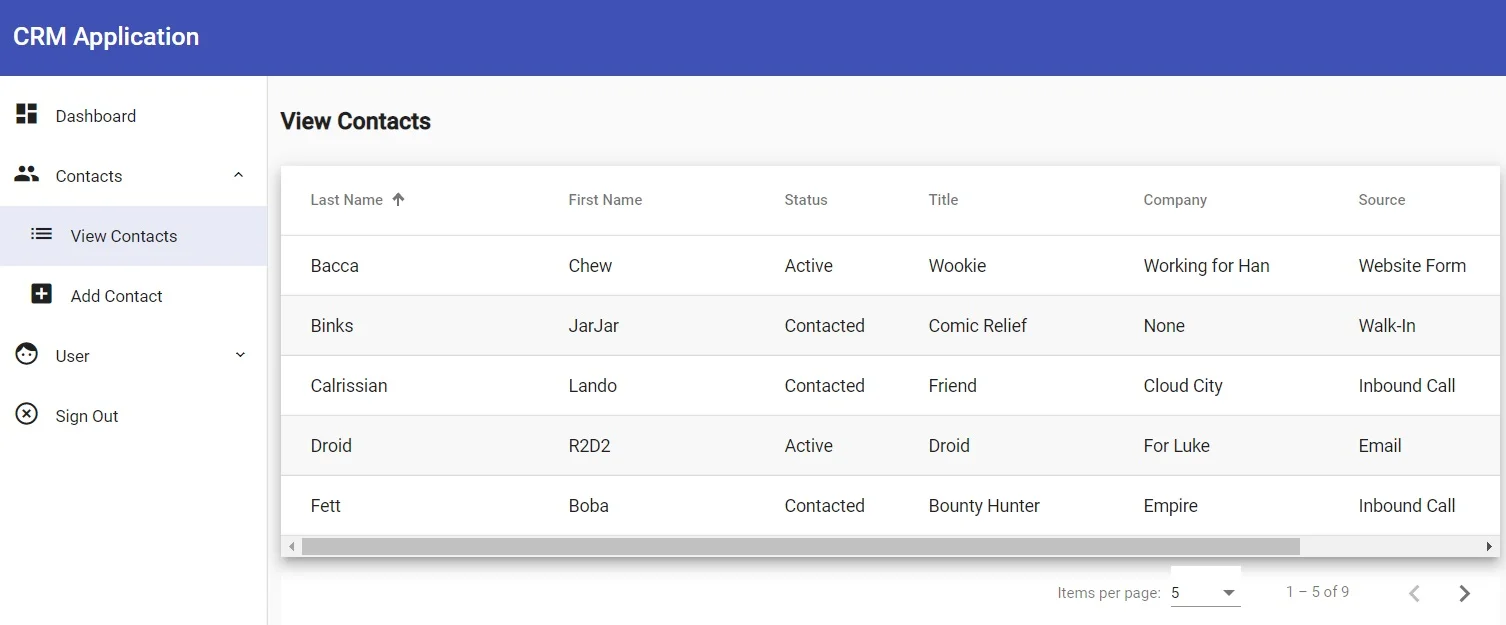
Now, click the Last Name header so you sort by last name in ascending order. Bingo:

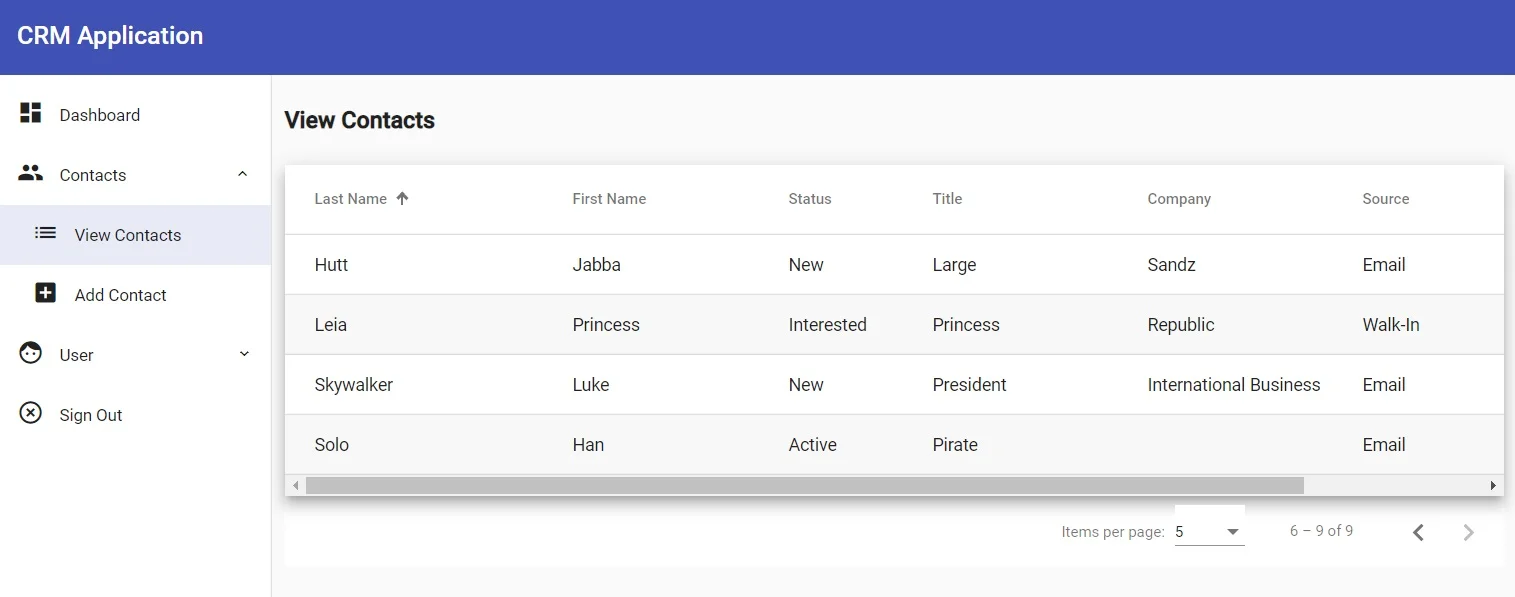
And, finally, click the right arrow towards the bottom of the table to navigate to the next page:

That's it!
Wrapping It Up
Well no, that's not it actually. Now it's your turn to tinker with the code and make some updates.
That's how you'll learn.
Change column widths. Add new columns. Look for ways to make improvements.
And, as always, feel free to browse the source on GitHub.
Have fun!


