Welcome to Part 18 of this series of guides on how to integrate Gmail with Angular and Spring Boot.
Now we're back in the UI. This time, you'll write code that makes it easy for users to compose and send an email.
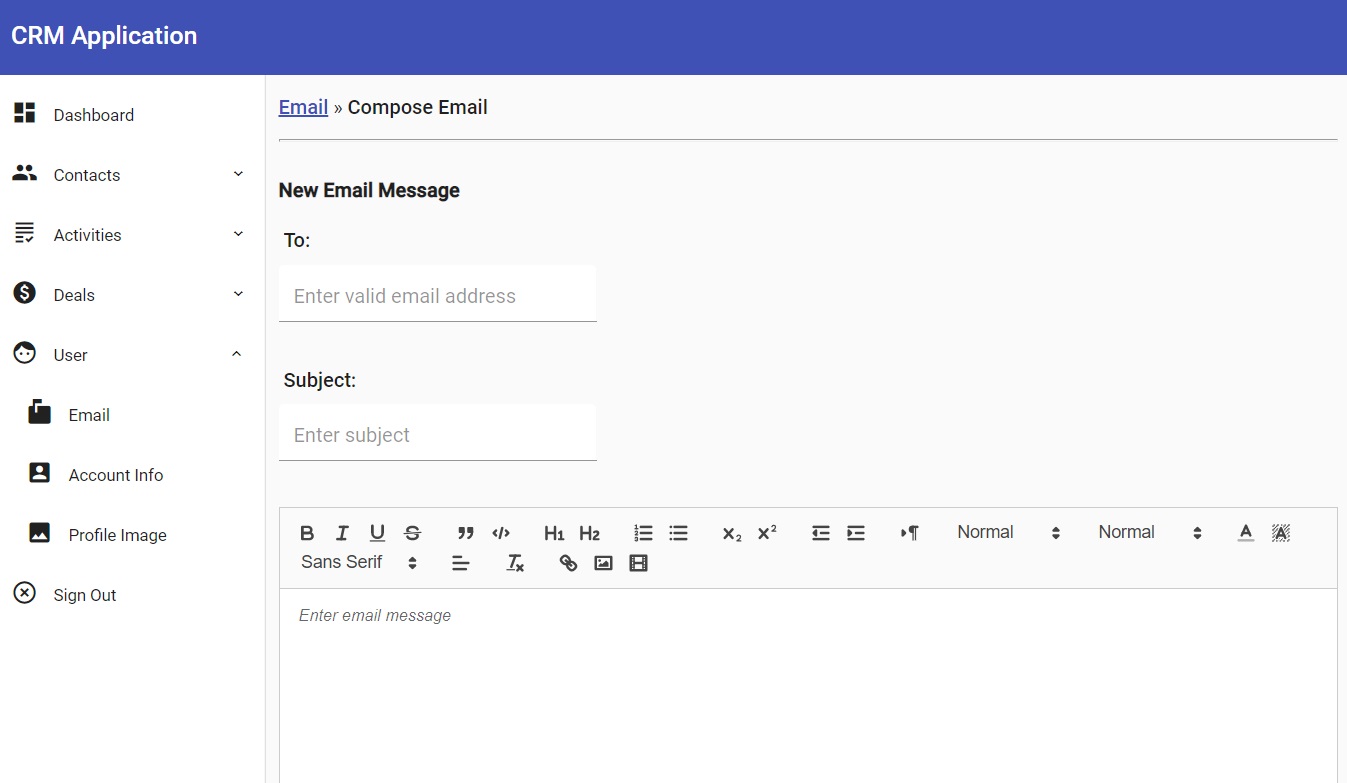
Even better: users can compose an HTML email with a WYSIWYG editor.
If you're unfamiliar with the acronym, WYSIWYG stands for "What You See Is What You Get." In this case, it means users won't have to type HTML markup manually. They can just press buttons to handle formatting and they'll see the formatting changes in real-time as they're editing.
The WYSIWYG editor will look something like this:

In this guide, I'll show you how to put that baby in your UI.
Alternatively, you can go straight to the source on GitHub.
The Position You're In
Thus far in the series, you have:
- Created an OAuth2 client ID and secret on Google Cloud Console
- Enabled the Gmail API via Google Cloud Console
- Set the necessary properties in your Spring Boot application.properties file
- Set up a DataStore implementation with its associated factory
- Set up a refresh listener
- Created a utility class that handles the Google authorization code flow
- Set up proper Gmail consent with the Google Cloud Platform
- Created a controller that handles a request to get the Google authorization code flow URL
- Used Postman to get the Google authorization code URL
- Used that URL to authorize your application to access your Gmail inbox
- Updated the controller so it handles a token request
- Updated the utility class so it creates the credential from a token
- Persisted that credential
- Used Postman to retrieve the token
- Learned why you didn't actually need to retrieve the token
- Learned about the structure of the Message object
- Learned about MIME
- Created an Email type that gets sent back to the client
- Wrote code that converts a Message object to an Email object
- Instantiated the Gmail service
- Used the Gmail service to retrieve just the messages you want to retrieve
- Used the Gmail service to extracted full Message objects from very lightweight objects
- Added a new endpoint to listen for inbox requests
- Used that endpoint to send back the user's most recent emails
- Learned how to disallow your application from accessing your inbox
- Created a new component on the Angular side that shows emails from the user's inbox
- Created a new service on the Angular side that retrieves emails from the Spring Boot microservice
- Optimized the payload response from the microservice
- Displayed HTML reference characters as they should be displayed
- Got rid of whitespace that isn't whitespace
- Designed a user-friendly, responsive inbox
- Created a UI so people can read individual email messages
- Learned about the security risks associated with displaying full HTML messages from the Gmail API
- Updated the back-end microservice to support sending emails
And if you haven't done those things, Part 1 is waiting for you.
The Next Position
In this guide, you will:
- Create a new component that will allow users to compose and send emails
- Add a toolbar to the inbox so users can compose an email with the press of a button
And then you can go back to elk hunting.
Service Oriented
Start by updating EmailService. Add the following method:
  sendEmail(email: Email): Observable<Email> {
    let url = `${baseUrl}/email/messages`;
    console.log("Send email URL is " + url);

    return this.http.post<Email>(url, email);
  }
That's going to hit the back-end microservice and use it to send the message defined in the Email object.
If you've been following along with these guides, then you've already seen how the API handles sending emails in plain text as well as HTML.
The method above returns an Email object as well. As of now, that will only include the ID of the sent email.
A Shiny New Component
Next, head over to the command prompt and create a new component:
ng g c features/user/email/compose-email
That's going to create the skeleton of the UI that users will use to compose and send emails.
Edit the newly created ComposeEmailComponent. Make it look like this:
@Component({
  selector: 'app-compose-email',
  templateUrl: './compose-email.component.html',
  styleUrls: ['./compose-email.component.css']
})
export class ComposeEmailComponent implements OnInit {

  form: FormGroup;
  formSubmitted: boolean = false;

  email: Email;

  lastField: string = 'to';

  editorStyle = {
    height: '300px',
    backgroundColor: '#ffffff'
  }

  @HostListener('document:keyup', ['$event'])
  handleKeyboardEvent(event: KeyboardEvent) {
    if (event.key == 'Tab' && this.lastField == 'subject') {
      let el: any = document.querySelectorAll('.ql-editor')

      if (el && el.length == 1) {
        el[0].focus();
        this.lastField = 'body';
      }
    }
  }

  constructor(private fb: FormBuilder, private emailService: EmailService,
    private userService: UserService, private alertService: AlertService,
    private router: Router) {
  }

  ngOnInit(): void {
    this.createFormGroup();
  }

  private createFormGroup() {
    this.form = this.fb.group({
      'html': ['', Validators.compose([Validators.required])],
      'to': ['', Validators.compose([Validators.required, Validators.pattern("^[a-z0-9._%+-]+@[a-z0-9.-]+\.[a-z]{2,4}$")])],
      'subject': ['', Validators.compose([Validators.required])]
    });
  }

  onSubmit() {
    this.formSubmitted = true;

    this.email = {} as Email;
    this.email.date = Date.now();
    this.email.from = this.userService.user.email;
    this.email.html = this.form.get('html').value;
    this.email.subject = this.form.get('subject').value;
    this.email.to = this.form.get('to').value;

    console.log(this.email);

    this.emailService.sendEmail(this.email).subscribe(
      (email: Email) => this.handleSendResponse(email),
      (err: Error) => this.handleSendError(err)
    );
  }

  private handleSendResponse(email: Email) {
    console.log("email send ID is " + email.id);
    this.alertService.success("Email sent successfully!", { keepAfterRouteChange: true });
    this.router.navigate(['/user/email/inbox']);
  }

  private handleSendError(err: Error) {
    this.alertService.error("Problem sending email!");
    console.error(err);
    this.formSubmitted = false;
  }

  blur(field: string) {
    this.lastField = field;
  }
}
There's a lot going on there. Let me give you the executive summary here.
For starters, take a look at the createFormGroup() method. That creates the object that aggregates all the fields the user will see in the UI.
In this case, there are only three fields: 'html,' 'to,' and 'subject.'
The 'html' field represents the email message itself in HTML format. The 'to' and 'subject' fields speak for themselves.
When the user sends the email, the email form on the HTML template gets submitted. And when that happens, the applications triggers the onSubmit() method above.
That's going to instantiate an Email object based on the values in the form fields and call the sendEmail() method that you created in the previous section.
If everything goes according to plan, the handleSendResponse() method will route the user back to the inbox with a success message. If you want to know more about how the success message works, feel free to check out my guide on alerts.
But what about @HostListener? Well, that's a hack.
To give the users the ability to compose HTML emails in WYSIWYG format, I'm using the Quill editor. But the problem is that when users tab from one element to the next, they'll have to tab through all those buttons in the toolbar to get from the "Subject" field to the editor.
That's a pain.
So the code listens for the tab key. If the user tabs away from the "Subject" field then the application immediately puts focus on the WYSIWYG editor and skips all those buttons in the toolbar.
That's also why the blur() method is necessary. It records the name of the form field that the user just left.
I've explained what's going on there more thoroughly in my guide on how to listen for key presses using @HostListener.
And if you'd like to know what's going on with that document.querySelectAll() business, feel free to check out my guide on how to programmatically put focus on any form field in the UI.
The Quill Editor?
I glossed over it up above but, yeah, I'm using the Quill editor on the UI. It's a neat client-side solution that handles WYSIWYG editing.
If you want to know how to implement it, feel free to check out my guide on how to add a WYSIWYG editor to the Angular UI.
You'll need to do that before you can proceed further here.
The Template
Next, edit compose-email.component.html. Make it look like this:
<div fxLayout="column">
  <div>
    <h4>New Email Message</h4>
  </div>
  <div>
    <alert></alert>
  </div>
  <div style="margin-bottom: 20px">
    <form [formGroup]="form" (ngSubmit)="onSubmit()">
      <div class="vertical-form-field">
        <div class="label">To:</div>
        <div>
          <mat-form-field appearance="fill" class="no-label-field" fxFlex="30" fxFlex.lt-md="100">
            <input autofocus formControlName="to" matInput placeholder="Enter valid email address"
                   maxlength="50" (blur)="blur('to')">
            <mat-error *ngIf="form.controls['to'].invalid">Please enter a valid to address</mat-error>
          </mat-form-field>
        </div>
      </div>
      <div class="vertical-form-field">
        <div class="label">Subject:</div>
        <div>
          <mat-form-field appearance="fill" class="no-label-field" fxFlex="30" fxFlex.lt-md="100">
            <input formControlName="subject" matInput placeholder="Enter subject"
                   maxlength="50"  (blur)="blur('subject')">
            <mat-error *ngIf="form.controls['subject'].invalid">Please enter a valid subject</mat-error>
          </mat-form-field>
        </div>
      </div>
      <div>
        <quill-editor #quill [styles]="editorStyle" formControlName="html" placeholder="Enter email message"></quill-editor>
      </div>
      <div style="margin-top:20px">
        <button *ngIf="!formSubmitted" [disabled]="!form.valid" type="submit" mat-raised-button color="primary">Send</button>
        <mat-spinner *ngIf="formSubmitted" [diameter]="50"></mat-spinner>
      </div>
    </form>
  </div>
</div>
Most of that is a basic reactive form. Nothing spectacular there.
And at the risk of sounding like a broken record, if you need to know more about how reactive forms work, feel free to check out my guide on how to add a responsive form to your Angular UI.
The first two fields in the form are the "To" and "Subject" fields, respectively. They use standard text inputs.
But the third field might be a little different than what you're accustomed to seeing on reactive forms. It's the <quill-editor> element you see above.
For starters, it's binding the editorStyle object from the component class to the styles property here. That's Quill's fairly unusual way of styling the WYSIWYG editor.
Go back to the component class and you'll see that editorStyle looks like this:
  editorStyle = {
    height: '300px',
    backgroundColor: '#ffffff'
  }
So the WYSIWYG editor will display 300 pixels high with a white background. That's what that means.
Why isn't all of that handled in CSS? Like I said, it's fairly unusual.
Next, take a look at formControlName in <quill-editor>. That binds the input field to the FormControl object defined in the component class.
In case it's not clear, that FormControl object is the one named "html."
That's pretty much all that's needed to create the WYSIWYG editor for the end user.
The <button> object at the bottom displays a big fat "Send" label. That's the button the user clicks when it's time to send the email. That button also submits the form which triggers the onSubmit() method you saw in the component class.
How does it trigger onSubmit()? Take a look at the <form> element towards the top. Pay particular attention to the (ngSubmit) event handler.
That's how.
Give 'Em a Toolbox
Now you've created a way for users to compose emails. How about creating an easy way for them to get to that UI?
I mean, don't make users type the URL in their browsers.
Speaking of that, make sure you add the necessary routing to UserModule.
...
  {
    path: 'email/compose-email',
    component: ComposeEmailComponent,
    data: {
      breadcrumb: 'Compose Email'
    }
  },
...
Next, edit inbox.component.html and add the following code just above the table:
<mat-toolbar>
  <button mat-icon-button aria-label="Action for selected emails">
    <mat-icon>check_box_outline_blank</mat-icon>
  </button>
  <button mat-icon-button aria-label="Compose email" (click)="composeEmail()">
    <mat-icon>create</mat-icon>
  </button>
  <button mat-icon-button aria-label="Refresh emails" (click)="loadInbox(true)">
    <mat-icon>refresh</mat-icon>
  </button>
</mat-toolbar>
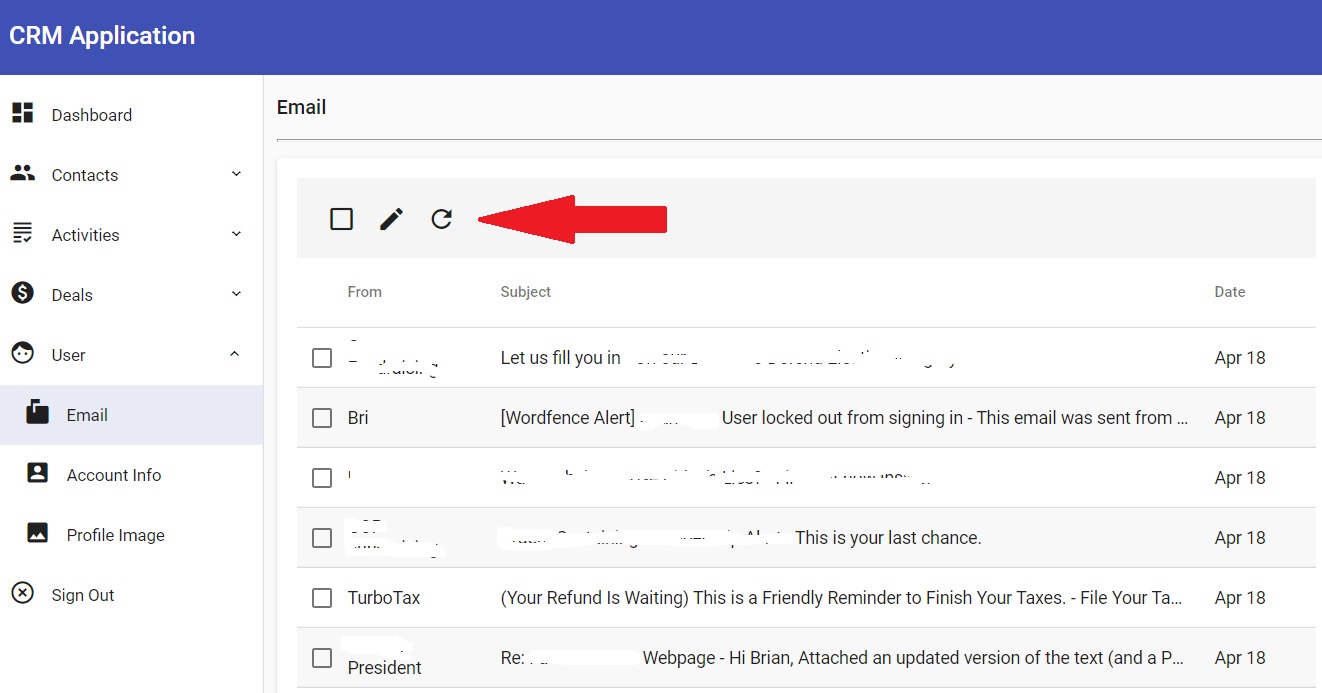
That's going to create a toolbar with three icon buttons.
The first button handles taking action on selected emails. It doesn't do anything for now.
The second button is what the user will click when he or she wants to create a new email. The (click) event handler triggers the composeEmail() method in the related component class.
The third button is what the user clicks to refresh the email inbox. It will get latest emails.
Here's what that toolbar looks like in action:

As usual, I had to redact a lot of stuff but you get the idea.
Now edit InboxComponent and add a new method:
  composeEmail() {
    let route = '/user/email/compose-email';
    this.router.navigate([route]);
  }
That's the composeEmail() method you saw just a moment ago. It redirects the user to the /user/email/compose-email route. That's the UI for creating and sending a new email.
Wrapping It Up
Keep in mind: the Quill editor will translate the user input into HTML. That HTML gets transmitted with the Email object to the back-end service. And that's how the email gets sent.
Give it a test run and make sure everything is working. You should now be able to compose an email from within the Angular app and send it via the downstream service.
Have fun!
Photo by Torsten Dettlaff from Pexels


