Welcome to Part 13 of this series of guides on how to integrate Gmail with Angular and Spring Boot.
And, finally, you'll work on the Angular side of the house. That means you'll start to see what the end-user sees!
Emphasis on "start." We've still got a long way to go before a finished product.
But we're well on our way.
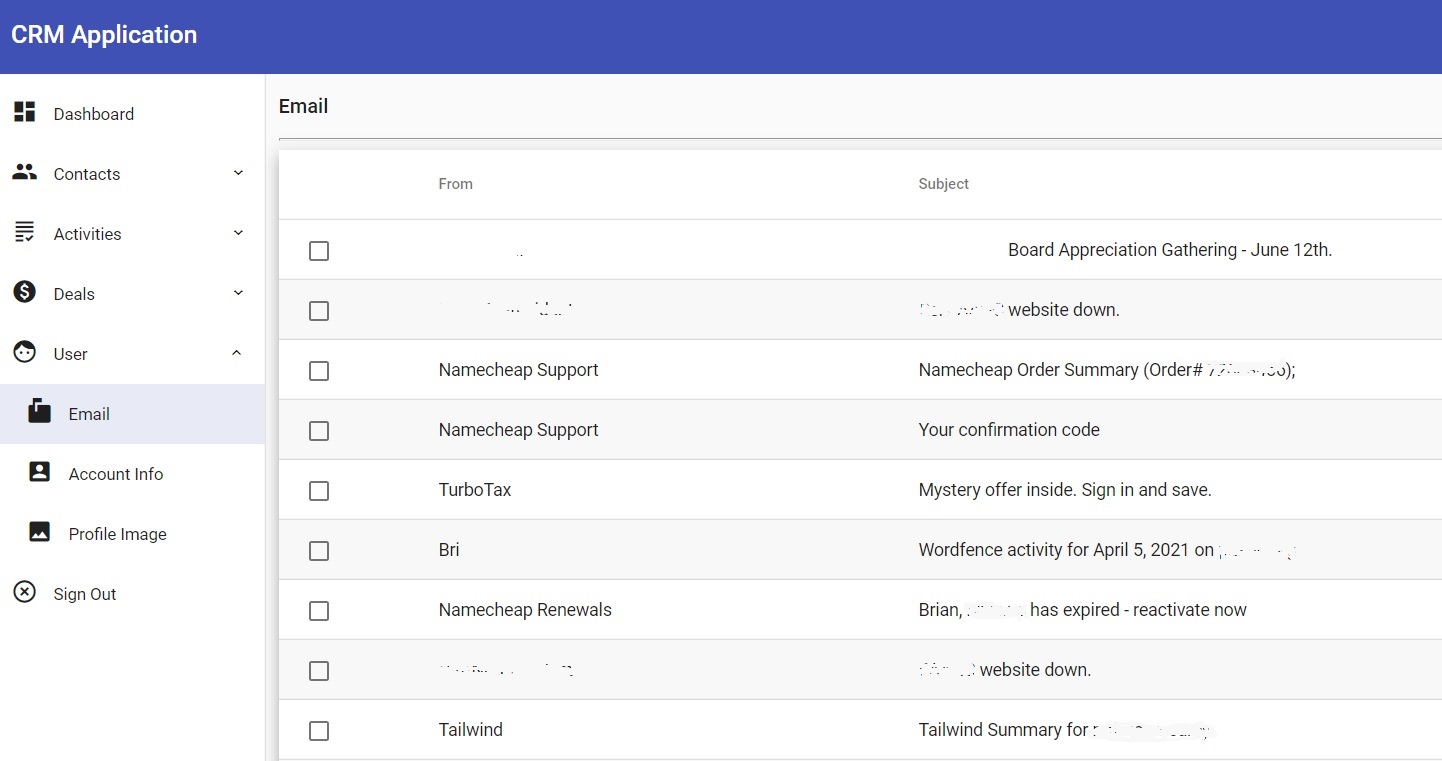
When you're done, you'll have something that looks like this:

Okay, something like that. I had to redact a few things to protect the innocent. But you get the idea.
You can follow along with this guide or you can go straight to the code on GitHub. It's your choice.
According to Plan
Thus far in the series, you have:
- Created an OAuth2 client ID and secret on Google Cloud Console
- Enabled the Gmail API via Google Cloud Console
- Set the necessary properties in your Spring Boot application.properties file
- Set up a DataStore implementation with its associated factory
- Set up a refresh listener
- Created a utility class that handles the Google authorization code flow
- Set up proper Gmail consent with the Google Cloud Platform
- Created a controller that handles a request to get the Google authorization code flow URL
- Used Postman to get the Google authorization code URL
- Used that URL to authorize your application to access your Gmail inbox
- Updated the controller so it handles a token request
- Updated the utility class so it creates the credential from a token
- Persisted that credential
- Used Postman to retrieve the token
- Learned why you didn't actually need to retrieve the token
- Learned about the structure of the Message object
- Learned about MIME
- Created an Email type that gets sent back to the client
- Wrote code that converts a Message object to an Email object
- Instantiated the Gmail service
- Used the Gmail service to retrieve just the messages you want to retrieve
- Used the Gmail service to extracted full Message objects from very lightweight objects
- Added a new endpoint to listen for inbox requests
- Used that endpoint to send back the user's most recent emails
- Learned how to disallow your application from accessing your inbox
And if you haven't done those things, Part 1 is waiting for you.
The Master Plan
In this part of the series, you will:
- Create a new component in the CRM app that will display the user's inbox
- Create a table that displays the "from" address and the subject for each email in a new row
- Create an email service that gets the user's inbox
And then you can go back to smoking Cuban cigars.
Back to the CRM
At this point, you're back to the CRM app that you've been working on for quite some time.
And if you haven't been working on that CRM app, you can still follow along. You'll just need to update the overall design accordingly.
So let's start by creating a new component. Call it Inbox.
At your command prompt, navigate to the root of your source tree. Alternatively, if you're using Microsoft VIsual Studio, you can open a terminal window (use "Developer Command Prompt" instead of "Developer PowerShell" if you're on Windows).
Then enter the following command:
ng g c features/user/email/inbox
That's going to create a skeleton component for you. Make sure you update UserModule to handle the new route:
export const routes = [
  { path: 'email/inbox', component: InboxComponent },
  { path: 'account-info', component: AccountInfoComponent },
  { path: 'profile-image', component: ProfileImageComponent }
];
Next, add navigation to the new inbox. Do that by putting a new clickable item underneath User in the left-hand sidebar.
That's easy enough to do. Just update menu.ts to include the following:
  {
    displayName: 'User',
    iconName: 'face',
    route: 'user',
    children: [
      {
        displayName: 'Email',
        iconName: 'markunread_mailbox',
        route: 'user/email/inbox'
      },
...
Now the user just needs to click that menu item to access his or her email inbox.
A Beautiful Model
Next, create a model.
No, not like in Weird Science. Instead, create a model that represents an email in the user's inbox.
Unsurprisingly, the model on the Angular side will mimic the model on the Java side.
So in the in email directory, create another directory called models. Add email.ts to it.
export interface Email {
  html: string;
  plainText: string;
  subject: string;
  date: number;
  from: string;
  to: string;
  id: string;
}
At Your Service
Now it's time to create the service that will handle email-related requests to that back-end microservice you created in Parts 1-11 of this series.
So, once again, create a subdirectory under email. Call it service.
And create a new file called email.service.ts. Make it look like this:
const baseUrl: string = environment.baseEmailServiceUrl;

const httpOptions = {
  headers: new HttpHeaders({
    'Content-Type': 'application/json',
  })
};

@Injectable()
export class EmailService {

  constructor(private http: HttpClient) { }

  fetchInbox(): Observable<Email[]> {
    let url = `${baseUrl}/email/inbox`;
    console.log("Fetch inbox URL is " + url);

    return this.http.get<Email[]>(url);
  }

  getDisplayableFrom(from: string): string {
    let cleanText: string = from.replace(/<\/?[^>]+(>|$)/g, "");

    if (cleanText.length > 20) {
      cleanText = cleanText.substring(0, 21) + '...';
    }

    return cleanText;
  }
}
A couple of things to keep in mind.
First, the class gets the base URL for the email service from the environment files. You'll have to update those files so that the URLs are specific to your own environment.
The first method, fetchInbox(), lives up to its name. That method uses the user's current JSON web token (JWT) to request the inbox emails from the downstream microservice.
If you're wondering where the JWT gets inserted into the request, remember that this application uses an interceptor to handle that. So it's automagic.
The fetchInbox() method returns an Observable that contains an array of Email objects.
Yes, that's the same Email type that you created a couple of sections ago.
The second method, getDisplayableFrom(), doesn't engage in any network activity. It's just a convenience method for translating an email "from" address from this format:
Joe Blow <joe.blow@xyzmail.com>
Into this format:
Joe Blow
In other words, it just strips out the tag containing the actual email address and leaves only the person's name.
It also shortens the person's name if it's too long.
Component Up
Next, it's time to create the component.
But you already did that way back towards the beginning of this guide. So all you need to do now is populate inbox.component.ts with the right code.
@Component({
  selector: 'app-inbox',
  templateUrl: './inbox.component.html',
  styleUrls: ['./inbox.component.css']
})
export class InboxComponent implements OnInit {

  displayedColumns: string[] = ['action', 'from', 'subject'];
  private loading: boolean = true;
  dataSource: MatTableDataSource<Email>;


  constructor(private emailService: EmailService, private alertService: AlertService) { }

  ngOnInit(): void {
    this.loadInbox();
  }

  private loadInbox() {
    this.emailService.fetchInbox().subscribe(
      (emails: Email[]) => this.handleInboxRetrieval(emails),
      (err: Error) => this.handleInboxError(err)
    );
  }

  private handleInboxRetrieval(emails: Email[]) {
    console.log(emails);
    this.dataSource = new MatTableDataSource(emails);
    this.loading = false;
  }

  private handleInboxError(err: Error) {
    console.error(err);
    this.alertService.error("Problem loading emails!");
    this.loading = false;
  }
}
Note that the code above uses MatTableDataSource. That should tell you that the application will display the emails in a table.
And indeed it does. As you saw in the pretty picture above.
If you look at the constructor, you'll see that the component also uses EmailService. That's the service you just created.
The ngOnInit() method has only one job: pass execution off to loadInbox().
That method uses EmailService to grab the user's emails from his or her Gmail inbox.
Once those emails come back, the application passes off execution to handleInboxRetrieval(). That method instantiates a MatTableDataSource object that includes the array of Email objects that just came back from the downstream microservice.
Also pay attention to that loading boolean. That tells the application when the emails are in transit (true) or when they've come back (false).
That boolean tells the application to show the spinner (true) or the email inbox (false). You'll see that in the template code.
Speaking of the template code...
Taming the Template
And, finally, open up inbox.component.html and make it look like this:
<div fxFlex fxLayout="column" fxLayoutGap="0px">
  <div style="margin-bottom:20px">
    <alert></alert>
  </div>
  <div class="absolute-center" *ngIf="loading">
    <mat-spinner [diameter]="80"></mat-spinner>
  </div>
  <div *ngIf="!loading">
    <div class="table-container mat-elevation-z8">
      <table mat-table [dataSource]="dataSource" matSort>

        <ng-container matColumnDef="action">
          <tr><th mat-header-cell *matHeaderCellDef></th></tr>
          <tr>
            <td mat-cell *matCellDef="let row" style="width:10%">
              <mat-checkbox></mat-checkbox>
            </td>
          <tr>
        </ng-container>

        <ng-container matColumnDef="from">
          <tr><th mat-header-cell *matHeaderCellDef mat-sort-header> From </th></tr>
          <tr><td mat-cell *matCellDef="let row" style="width:30%"> {{emailService.getDisplayableFrom(row.from)}} </td><tr>
        </ng-container>

        <ng-container matColumnDef="subject">
          <tr><th mat-header-cell *matHeaderCellDef mat-sort-header> Subject </th></tr>
          <tr><td mat-cell *matCellDef="let row" style="width:60%"> {{row.subject}} </td></tr>
        </ng-container>

        <tr mat-header-row *matHeaderRowDef="displayedColumns"></tr>
        <tr mat-row *matRowDef="let row; columns: displayedColumns;"></tr>
      </table>
    </div>
  </div>
</div>
It's outside the scope of this article to explain everything that's going on there, so I'll hone in on the important parts.
That <table> element houses the whole inbox (for now). It uses an Angular Material table to display the info.
If you're unfamiliar with how to create an Angular Material table from scratch, you're welcome to visit my guide on how to create an Angular Material table from scratch.
The big takeaway here is the table has three columns. Happily enough, they match the three strings in the displayedColumns array that you saw in the component class.
The first column, called "action," will include a simple checkbox that does nothing for now. Eventually, you'll implement it so users can take some kind of bulk action (like delete) on all checked emails.
The next two columns show the email's "from" and "subject" attributes, respectively.
Take a close look at that "from" column and you'll see that the code uses getDisplayableFrom() from EmailService to format the "from" string.
The "subject" column just spits out the subject as-is (for now).
Doing It in Style
I shouldn't have written the word "finally" in the previous section. Because there's one more section to go.
You need to add styling. Modify your inbox.component.css file to look like this:
table {
  width: 100%;
}

.mat-row:nth-child(even) {
  background-color: #F8F8F8;
}

.mat-row:nth-child(odd) {
  background-color: #FFFFFF;
}

.mat-row:hover {
  background-color: #E8EAF6;
}
Key takeway up there is the middle class definitions display alternate rows in light-grey hue. That just makes it easier for users to scan the inbox.
The last definition highlights the row a pretty shade of light blue when the user hovers over it. That follows the same pattern you've seen before if you've been following the CRM series.
Wrapping It Up
Welp, you've already seen the finished product. So there's no point in going through the "test drive" thing.
Instead, it's over to you. Save all your files. Start your Angular application and start all the necessary downstream microservices.
Then, test it out by logging in with a user who's got email integration. You can view the inbox by just going to User and then Email on the left-hand sidebar.
Have fun!
Photo by Aleksandar Pasaric from Pexels\


