If your web form has a dropdown list that includes lots of options, you might want to make your users' lives easier with type-ahead. Fortunately, Angular Material lets you do that pretty easily.
In this guide, I'll show you how to make it happen.
By the way: if you're unfamiliar with type-ahead, it's a way to filter the results in a dropdown. The user just starts typing characters into the field and the list gets whittled down to only options that begin with the characters the user typed.
Type-ahead is user-friendly because users don't have to scroll through a seemingly endless list just to find what they're looking for.
Anyhoo, let's get on with the guide.
Or if you'd like to go to the source, you can do that too.
Remember: if you're having problems running the Angular app locally, be sure to check the README.
Please note: this guide is a part of an ongoing series of tutorials on how to create a customer relationship management (CRM) application from scratch. The GitHub code for each guide belongs to a specific branch. The master branch holds the entire application up to the current date. If you want to follow the whole series, just view the careydevelopmentcrm tag. Note that the website displays the guides in reverse chronological order so if you want to start from the beginning, go to the last page.
The Business Requirements
Your boss Smithers walks into your office. You're surprised to see that he's smoking a cigar.
Smithers sits down and takes the cigar out of his mouth so he can talk to you.
"It's about that CRM app you're working on," he says. "I need you to make a change to the contact form."
Smithers puts the cigar in his mouth and takes a puff. Thankfully, he blows the smoke away from you.
"Before you just added a free-text field for company name. Now I need you to make that a dropdown. Read the list of available account names from the MongoDB collection."
He puffs again.
"And by the way, I need you to support quick adds as well. In other words, users should be able to type in an account name that doesn't exist."
He puts the cigar back in his mouth and walks out of your office.
Taking It to the Next Level
So you've already got a contact form that people can use to add and edit contacts. Now you just need to make a change.
That "Company" field is going away. Instead, it's going to be an "Account" field with a dropdown.
And the dropdown will support type-ahead. That's why you're here, isn't it?
But you also want to enable users to quick-add a new account name. For that purpose, you'll hijack the type-ahead code.
Yeah, it's a hack. But it's a good one.
Modifying the Module
Don't forget to add the Angular Material modules that supports type-ahead!
You can see all the modules I've added here. You won't need all of them but if you get error messages that tell you the system doesn't recognize some of your tags, you're probably missing a module.
At a minimum, though, import MatAutoCompleteModule, MatInputModule, and MatSelectModule.
Customizing the Component
First, edit basic-info-form.component.ts. Add a few new variables:
  availableAccounts: Account[] = [{ name: "Loading...", id: "-1"}];
  filteredAccounts: Observable<Account[]> = of(this.availableAccounts);
  newAccount: boolean = false;
The availableAccounts array will list all available accounts. However, since they need to be loaded from the database, the code defaults the array to just a single element that reads "Loading..." while the data is loading.
The filteredAccounts array lives up to its name. It keeps the accounts that match the user's type-ahead criteria.
If you're paying close attention, you might notice that filteredAccounts is an Observable. That's because it's using a publish/subscribe model to listen for keypresses. When a user starts typing into the input field, the application will start filtering the available accounts.
The newAccount boolean indicates whether or not the user is creating a new account. I'll revisit that one a little later.
Accessing the Accounts
As I've mentioned before, you need to get the list of accounts from the database. So you'll need to include code that handles that process:
  private loadAccounts() {
    this.accountService.fetchAllAccounts().subscribe(
      (accounts: Account[]) => this.handleFetchAccountsResponse(accounts),
      err => this.handleFetchAccountsError(err)
    );
  }

  private handleFetchAccountsResponse(accounts: Account[]) {
    this.availableAccounts = accounts;

    this.filteredAccounts = this.basicInfoFormGroup.controls['account'].valueChanges.pipe(
      startWith(''),
      map(value => this.filterAccount(value))
    );
  }

  private filterAccount(name: string): Account[] {
    const filterValue = name.toLowerCase();
    return this.availableAccounts.filter(account => account.name.toLowerCase().indexOf(filterValue) === 0);
  }

  private handleFetchAccountsError(err: Error) {
    console.log(err);
  }
The first method, loadAccounts(), uses AccountService to fetch all accounts.
If the fetch works as expected, the code will enter handleFetchAccountsResponse(). That method does two things.
First, it sets availableAccounts to the array that just got returned from the downstream service.
Next, it kicks off the whole process of listening for changes on the account field. Again, that's when the filter magic happens.
And you can see that filter magic in the same method. The code grabs the Observable returned by valueChanges() and responds to input changes in the pipe().
The startWith() RxJS method emits an empty string so the code begins with a clean slate.
Next, it handles the task of filtering the options in the dropdown list. You can see that action in filterAccount(). That method filters the existing (possibly already filtered) array of available options to match the user's input.
First, it converts the user's input to lower case. Then, it converts the names of all accounts to lower case as well. That's so it can perform a case-insensitive search.
Then it uses indexOf() to search for the type-ahead text in the account name. If it finds that text at the beginning of the account name, then the account will get included in the filter.
How does it know when the type-ahead text is at the beginning of the string? That's when indexOf() equals 0.
The indexOf() method shows you the position of a substring within another string. So if that position is 0 then it's at the beginning of the string.
User-Friendliness
Next, do something user-friendly and let users know if they created a brand new account on the fly.
Here's the method that handles that:
  leftAccountField() {
    this.newAccount = false;
    let account: Account = this.getAccount(this.basicInfoFormGroup.controls['account'].value);

    this.newAccount = (account && !account.id);
  }
That method gets executed whenever the user leaves the account field. The account field listens for someone leaving with the (blur) event listener.
The code above checks to see if the value of the account field is in the list of account names retrieved from the database.
If it's not, then the code creates a new Account lightweight object on the fly. You can see that in the getAccount() method:
  private getAccount(accountName: string): Account {
    let account: Account = null;

    if (accountName) {
      account = this.availableAccounts.find(a => a.name.toLowerCase() == accountName.toLowerCase());

      if (!account) {
        account = { name: accountName, id: null };
      }
    }

    return account;
  }
The lightweight Account object just includes the account name and ID. If the account doesn't already exist in the database, then the ID is null.
And if that's the case, then the newAccount boolean gets set to true. See the previous code block.
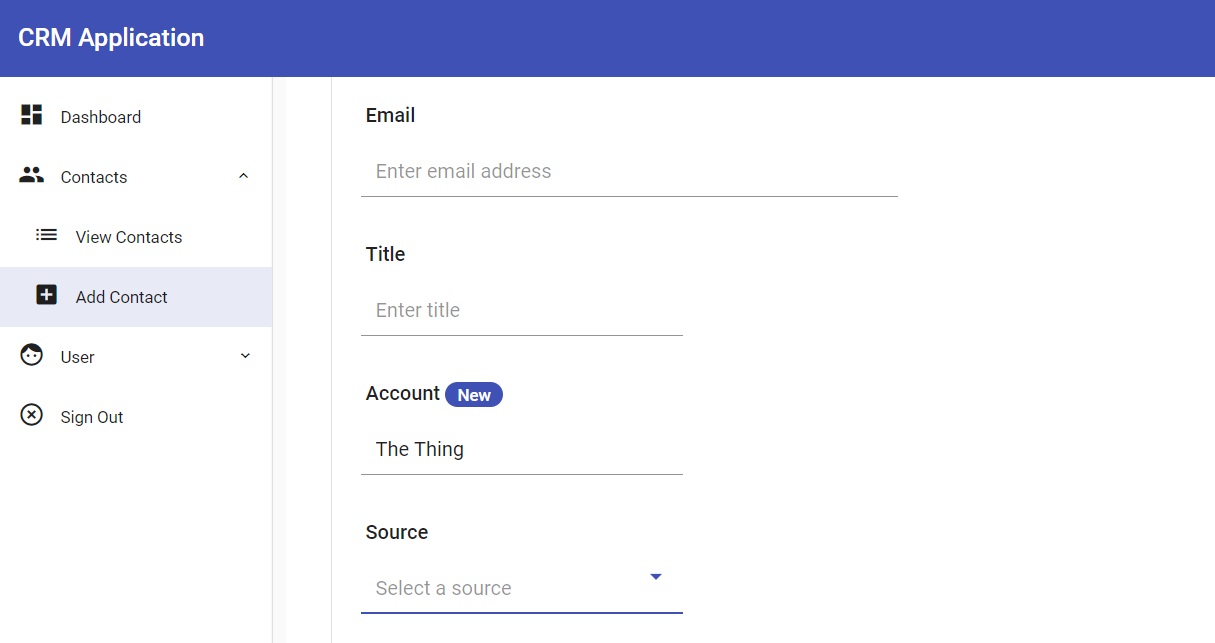
When the newAccount boolean is true, the front-end displays a pretty blue badge that informs users that they just created a new account.
Fixing the Front End
Now it's time to edit the corresponding HTML code.
Delete the whole section where users once added a company name and replace it with this:
    <div class="vertical-form-field">
      <div class="label">Account <span *ngIf="newAccount" class="badge badge-info">New</span></div>
      <div>
        <mat-form-field appearance="fill" class="no-label-field" fxFlex="30" fxFlex.lt-md="100">
          <input type="text"
                 placeholder="Select or enter account name"
                 matInput
                 formControlName="account"
                 [matAutocomplete]="auto"
                 (blur)="leftAccountField()">
          <mat-autocomplete autoActiveFirstOption #auto="matAutocomplete">
            <mat-option *ngFor="let account of filteredAccounts | async" [value]="account.name">
              {{account.name}}
            </mat-option>
          </mat-autocomplete>
          <mat-error *ngIf="basicInfoFormGroup.controls['account'].invalid">Please enter or select a valid account name</mat-error>
        </mat-form-field>
      </div>
    </div>
A couple of things you'll want to key in on here.
First, note the <span> element next to the word "Account" at the top. That's where the user will see the "New" badge upon creating a new account.
Next, take a look at what's not there. There's no <select> element. What gives?
Here's what gives: the code is letting users handle type-ahead with the <input> field. Then, the application will highlight the first matching option from the list of options. You can see that in the <mat-autocomplete> element.
So yes, users can still point and click their way to an account name. But they can also just start typing and find one that matches.
You might wonder how the <input> element get associated with that <mat-autocomplete> element. Pay attention to [matAutocomplete] in the <input> element. It's set to "auto."
Now look at <mat-autocomplete> and notice that #auto. What does that do?
It gives the element a name. In this case it names the element "auto." That's how the <input> element references it in [matAutocomplete].
The (blur) event listener in <input> listens for when users navigate away from the field. Then it executes the leftAccountField() method which I showed you above.
That method, by the way, determines whether or not the UI should show the "New" badge. It will only show the badge if the user entered a new account name rather than selecting one from the list.
Finally, don't miss the fact that <mat-option> is using the async filter. That's because the array of account names is wrapped in an Observable.
Oh, by the way: this type-ahead thing works best if the value in the option field matches the text. I'm sure there are ways to do it when the value and the text differ, but it would require an additional level of effort.
Entering a New Account
Remember: Smithers said that you also have to give users the ability to enter a new account name on the fly. So how do you do that?
With the type-ahead.
It's simple. If the type-ahead doesn't match anything in the dropdown, then whatever the user put in there becomes the new account name.
Like I said: it's a hack. But it's a good one.
Go back through the component code I covered above and you'll see that it handles adding new account names beautifully.
Testing Time
After all that... does it work?
Only one way to find out. Test it.
Launch your downstream services and the UI. Login to the Angular app, navigate to Contacts and Add Contact on the left-hand menu.
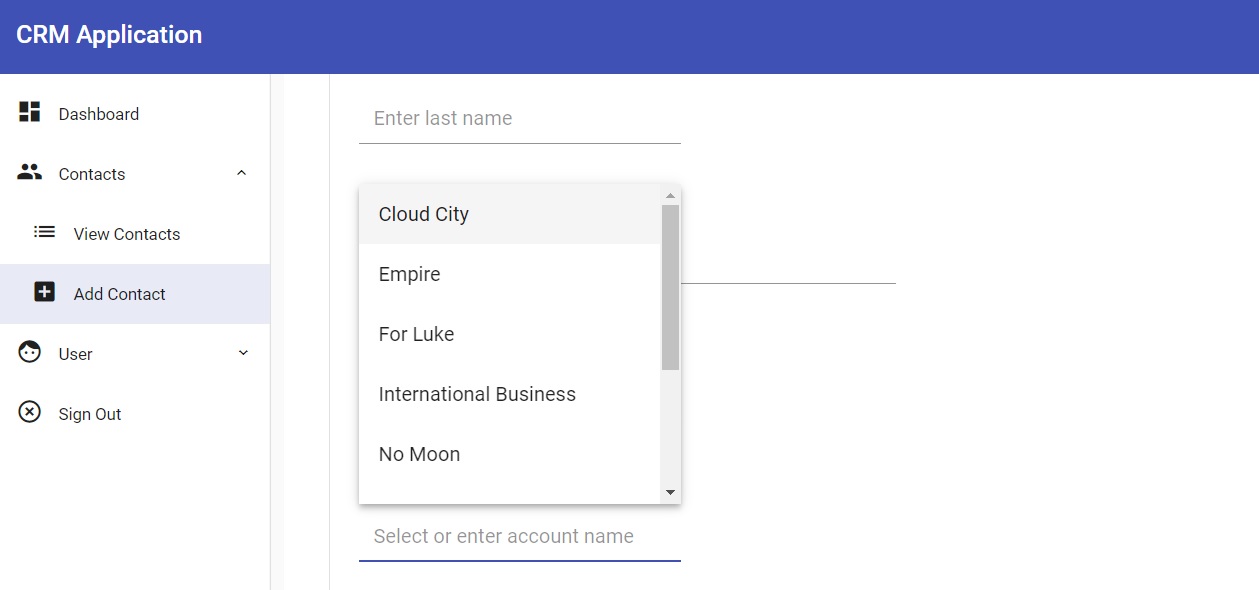
Now just click in the Account field. You should see a drop-down with all the possible values.

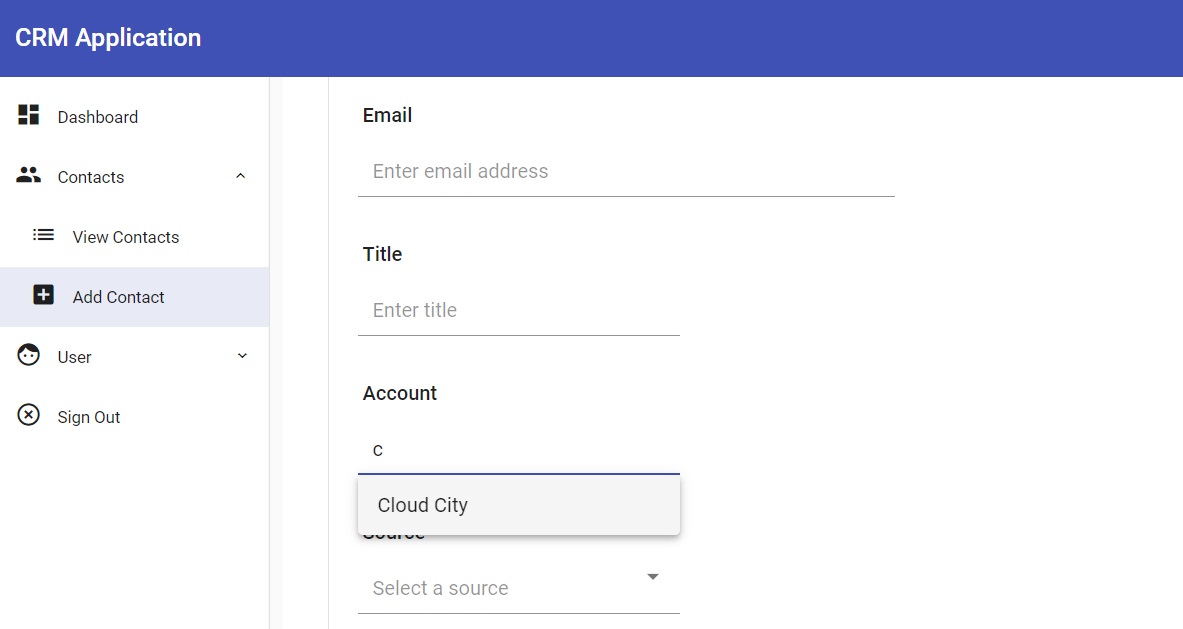
Next, just enter the letter "C" in the Account field. The drop down should only show you account names that begin with the letter "C." In my case, that's "Cloud City."

Finally, just type in the name of a new account in the account field. Make it something that isn't in the dropdown list.
Then tab away. You should see a badge informing you that you created a new account.

Excellent! It works!
Wrapping It Up
You're not done. It's time to apply what you've learned here to suit your own business requirements.
Why not try to make it work when the value in the option field doesn't match the text? Or try to add multiple type-aheads to one form.
The possibilities are endless.
Of course, you can always visit the code on GitHub.
Have fun!


