Do you have an application that can take users multiple levels in the UI? If so, then you'll probably want to add breadcrumbs so they can easily get back to where they were.
At least, if you believe in user-friendly development.
And you do. Otherwise you wouldn't be here.
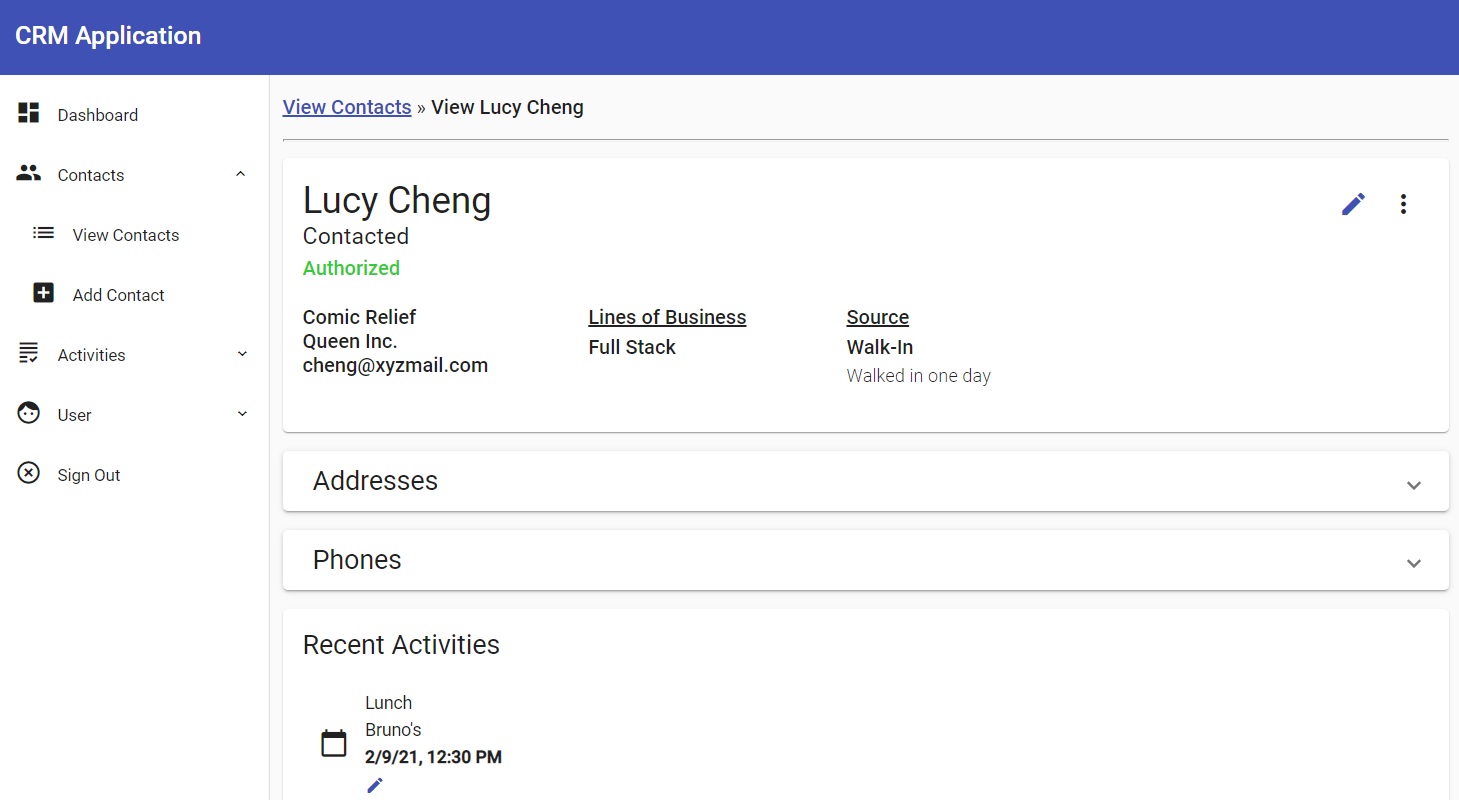
Anyhoo, in this guide I'll show you how to create breadcrumbs. At the end of the day, you'll have something that looks like this:

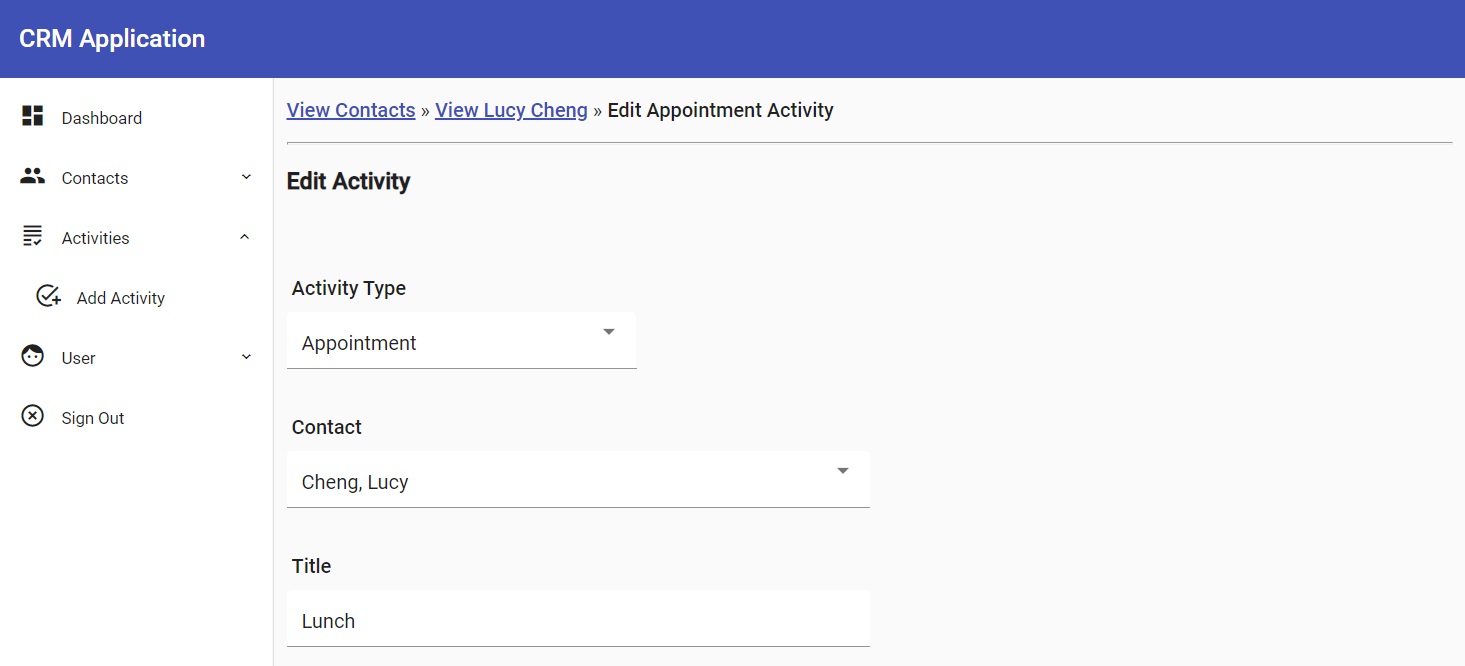
And then when the user clicks that pencil icon at the bottom of the image to edit an activity, the application will display breadcrumbs like this:

As you can see, by the way, those breadcrumbs above are dynamic. They don't just display static text like "View Contact." They display the contact's name as well.
I'll show you how to make that happen in this guide.
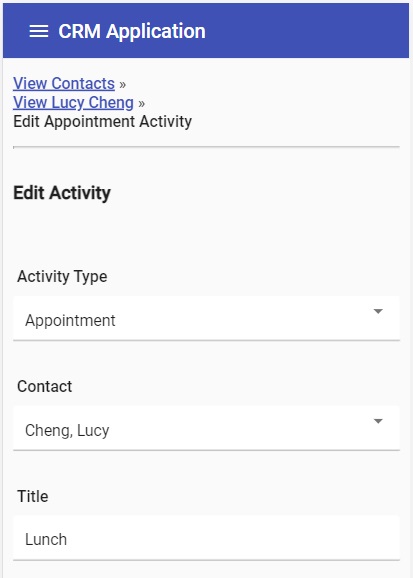
Oh, yeah. The breadcrumbs you create will also look great on a mobile device:

Boom-shaka-laka! That's what I'm talking about.
If you want to learn how to do all that stuff, just follow along here or go straight to the source.
Remember: if you're having problems running the Angular app locally, be sure to check the README.
Please note: this guide is a part of an ongoing series of tutorials on how to create a customer relationship management (CRM) application from scratch. The GitHub code for each guide belongs to a specific branch. The master branch holds the entire application up to the current date. If you want to follow the whole series, just view the careydevelopmentcrm tag. Note that the website displays the guides in reverse chronological order so if you want to start from the beginning, go to the last page.
The Business Requirements
Your boss Smithers walks into your office. He sits down with a stern look on his face.
"It's about that CRM app you're working on," he says. "Where are the breadcrumbs?"
You're about to answer but Smithers doesn't let you.
"It's user-hostile to make people follow their original path to get back to where they just were!" he says. "Give them some breadcrumbs so they can easily go back."
Smithers points his finger at you.
"I can't believe you didn't think about this all by yourself!"
He walks out of your door without ever letting you speak.
The Challenge Here
Now if you use your favorite search engine to look for a breadcrumbs solution with the Angular Material UI, you'll find plenty of libraries out there.
But, truth be told, that's really the problem, isn't it?
It seems like Angular apps require countless third-party libraries just to get them to the point of basic functionality.
Some of those libraries are poorly documented. Others don't work as expected. Still others might not work with the version of Angular that you're using.
It's a hot mess.
That's why, the longer I'm into this Angular stuff, the more inclined I am to write my own code that handles basic functionality.
Like, for example, breadcrumbs.
So that's what's going on here. I wrote my own breadcrumbs code and now I share it with you.
Because I'm cool like that.
A Modern Module for a Classy Component
Start as you usually do with this kind of thing. Create a new module.
Go original and call it "breadcrumb."
Type this at your command line:
ng g m ui/breadcrumb
That's going to give you the module. How's about a component to go with it?
ng g c ui/breadcrumb
Excellent. Now make sure you import that module in app.module.ts by adding it to the imports array.
Then make sure you export breadcrumb.component.ts from breadcrumb.module.ts.
Here's what that code looks like:
import { NgModule } from '@angular/core';
import { CommonModule } from '@angular/common';
import { BreadcrumbComponent } from './breadcrumb.component';

@NgModule({
  imports: [CommonModule],
  declarations: [BreadcrumbComponent],
  exports: [BreadcrumbComponent]
})
export class BreadcrumbModule { }
So what are you doing there? You're making BreadcrumbComponent available to any other module that imports BreadcrumbModule.
If you don't export BreadcrumbComponent, you'll get an error when you try to reference it.
By the way: the reason you're making this thing a module instead of just a simple component is because it's a component that uses its own service. Whenever the solution follows that pattern, it's a good idea to go the module route.
And finally create the breadcrumb.ts model:
export interface Breadcrumb {
  name: string;
  url: string;
  queryParams?: any;
  pauseDisplay?: boolean;
}
The name property is the anchor text that users will see in the breadcrumb trail. Examples include: "View Contacts," "View Lucy Cheng," and "Add Activity."
The url property is the route that users will follow if they click on that breadcrumb. Examples include: "/contacts/view-contacts," and "activities/add-activity."
The queryParams property is optional. It gets populated if there are any query parameters associated with the route. An example of a route with a query parameter looks like this:
contacts/view-contact?id=6014199147692f2a4194ff95The pauseDisplay boolean signals whether or not the application should wait before displaying the breadcrumb.
Why would it want to wait? Because if the user is visiting a link with a custom breadcrumb name (like "View Lucy Cheng") then the app needs to wait until the contact info is loaded from the database.
Only then will it know which name to display.
Assembling a Service
Next, it's time to create a service that will handle dynamic updates to breadcrumbs. It's going to handle creating custom breadcrumb names (like the aforementioned "View Lucy Cheng").
So here's how it will work: when the user clicks a link that goes to a route with a custom breadcrumb name, the component responsible for that route will invoke the breadcrumb service to populate the name.
Normally, the application will get the name of the breadcrumb from the name that's on the left-hand sidebar menu. So if the user clicks on View Contacts from the menu then the name of the breadcrumb is "View Contacts."
But that doesn't work if the user is viewing or editing a specific contact. In that case, you'd need to populate the name of the breadcrumb with the name of the contact (again, like "View Lucy Cheng").
That's why the service is necessary. It will handle updating the breadcrumb name once the application has all the necessary info.
So without further ado, create breadcrumb.service.ts.
import { Injectable } from '@angular/core';
import { Observable, Subject } from 'rxjs';

@Injectable({ providedIn: 'root' })
export class BreadcrumbService {
  private subject = new Subject<string>();

  onUpdate(): Observable<string> {
    return this.subject.asObservable();
  }

  updateBreadcrumb(str: string) {
    this.subject.next(str);
  }
}
Yep. That's it.
The service creates an Observable to "listen" for updates to breadcrumb names.
Here, the Observable is expressed as a Subject. Even though there's no need for multicasting, Subject works great in this case because it's both an Observable and an Observer. It's easy to emit values with just a few lines of code.
The updateBreadcrumb() method accepts a string. That string happens to be the new name of the breadcrumb and it gets emitted to the subscriber.
The onUpdate() method simply exposes the Subject as an Observable to anyone who wants to listen for breadcrumb name changes. I'll cover that in more detail in the next section.
Let Them Eat Crumbs
You've already created the component that will handle this. Now you need to populate it with code.
There's quite a bit of code that goes into that beast. I'll cover it bit-by-bit.
  breadcrumbs: Breadcrumb[] = [];
  currentUrl: string = '';
First up: the component declares a couple of variables.
The breadcrumbs array holds the current Breadcrumb objects. Each object represents a breadcrumb that the user sees on the screen.
The currentUrl string holds the current url minus any request parameters. It's what the component will use to identify the name of the breadcrumb that gets displayed (for example, "View Contacts").
  private setDefaultBreadcrumb() {
    this.setCurrentUrl();

    if (this.currentUrl) {
      let navItem: NavItem = this.findRoute();

      if (navItem) {
        let breadcrumb: Breadcrumb = { name: navItem.displayName, url: this.currentUrl };
        this.breadcrumbs.push(breadcrumb);
      }
    }
  }
That method gets run when the component is first instantiated. It sets the default breadcrumb when the user logs in.
It's necessary because the component listens for route changes. However, there's no route change upon login because the component just got instantiated. So it's necessary to set a default route.
I'll cover the findRoute() method you see referenced in there a little later.
  private listenForBreadcrumbUpdate() {
    this.breadcrumbService.onUpdate().subscribe((str: string) => {
      this.handleBreadcrumbUpdate(str);
    });
  }

  private handleBreadcrumbUpdate(str: string) {
    //breadcrumb updates only happen on current route
    //so the breadcrumb we need to update is the latest one
    let lastBreadcrumb: Breadcrumb = this.breadcrumbs[this.breadcrumbs.length - 1];

    if (lastBreadcrumb.pauseDisplay) {
      lastBreadcrumb.pauseDisplay = false;
      lastBreadcrumb.name = str;
    }
  }
The listenForBreadcrumbUpdate() method subscribes to the Observable exposed by the service you created in the previous section. It does that so it can listen for updates to breadcrumb names.
When the Observable emits a value, the handleBreadcrumbUpdate() method begins its work by finding the last breadcrumb in the array.
Why? Because the only time the application will update the breadcrumb name is when it's the breadcrumb that belongs to the current route.
So that's always the last one in the array.
Next, that method checks the pauseDisplay boolean in the Breadcrumb object. If it's true, then the code will flip the boolean to false and update the breadcrumb name.
That if check is necessary so the code doesn't keep updating the breadcrumb over and over again. If it's already been updated, it doesn't need to be updated again.
By the way, once that pauseDisplay boolean is set to false, the UI will display the breadcrumb.
  private listenForRouteChange() {
    this.router.events.pipe(
      filter(event => event instanceof NavigationEnd),
      map(() => this.activatedRoute),
      map(route => {
        while (route.firstChild) {
          route = route.firstChild;
        }
        return route;
      }),
      distinctUntilChanged()
    ).subscribe(
      (route: ActivatedRoute) => this.handleCurrentRoute(route)
    );
  }
That method listens for when the user navigates to a different route.
It does that by subscribing to the events Observable from Router.
Before the code gets to the subscription, though, it puts that Observable through a pipe().
First, filter() eliminates all events except NavigationEnd. That's the event that gets triggered when the user's route change ends successfully.
Once that's done, the map() operation maps the current event to the currently activated route. Which means it basically just grabs the currently activated route.
That ActivatedRoute object, by the way, is injected in the constructor.
But ActivatedRoute maintains a state tree. The object at the top of that tree may not be the route that the code needs to examine. So that second map() operation keeps grabbing descendants of the ActivatedRoute object until there are no more descendants to grab.
That last operator in pipe() is distinctUntilChanged(). That's going to give the code an Observable that only returns items distinct from the previous item. Leave that operator out and the code will still work, but it might not run as efficiently as it should.
Finally, after all that pipe() work, the code subscribes to the Observable and delegates that work of handling the ActivatedRoute object to the handleCurrentRoute() method.
  private setCurrentUrl() {
    let url: string = this.router.url;

    if (url) {
      this.currentUrl = this.urlService.shortenUrlIfNecessary(url.substring(1));
    }
  }
This method sets the currentUrl property.
It starts by grabbing the URL from the Router object. That Router object, by the way, was injected in the constructor.
Then the code "massages" the URL. It does that by getting rid of the initial slash. Then it shortens the URL by getting rid of any trailing query parameters.
You can take a look at that shortenUrlIfNecessary() method in the UrlService class.
  private handleCurrentRoute(route: ActivatedRoute) {
    this.setCurrentUrl();

    let navItem: NavItem = this.findRoute(menu);

    if (navItem) {
      this.handleTopLevelBreadcrumb(navItem);
    } else {
      this.addBreadcrumb(route);
    }
  }
This is the method that gets invoked when the events Observable from Router emits an event.
First, the method invokes the aforementioned setCurrentUrl() method. The code here needs to examine the current URL to determine how to display the breadcrumb.
Next, the code invokes findRoute(). I'll cover that method in a moment. For now, keep in mind if may return a NavItem object.
Remember: a NavItem object represents a menu item on the left-hand sidebar.
So here's what's going on. The code will try to match the current URL to any of the navigation items on the left-hand sidebar.
If there's a match, then the code "resets" the breadcrumbs. Everything starts over again because the user is clicking on an item on the sidebar.
However, if there's no match (navItem above is null) then the code needs to add a breadcrumb to the current array of breadcrumbs. That's because the user clicked on a link somewhere in the content (like an Edit Contact link or an Edit Activity link).
  private addBreadcrumb(route: ActivatedRoute) {
    if (this.breadcrumbs.length < 6) {
      let breadcrumb: Breadcrumb = null;

      route.data.subscribe((data: any) => {
        breadcrumb = { name: data.breadcrumb, url: this.currentUrl, pauseDisplay: data.pauseDisplay };
      });

      if (breadcrumb) {
        if (breadcrumb.url != this.breadcrumbs[this.breadcrumbs.length - 1].url) {
          route.queryParams.subscribe((queryParams: any) => {
            if (queryParams) {
              breadcrumb.queryParams = queryParams;
            }
          });

          this.breadcrumbs.push(breadcrumb);
        }
      }
    }
  }
You'll be shocked to learn that the addBreadcrumb() method adds a Breadcrumb object to the current array.
That first if check just stops the breadcrumb addition if there are already five breadcrumbs in the array. We don't need to get carried away here.
Next, the code gets info from the data Observable of ActivatedRoute. Now what the heck is that?
Well that data object is a gift from the folks at Angular to all of us developers. It lets us add supplemental info (like breadcrumb data) to a route.
And where do we add it? When we define routes for a module. Take a look at contacts.module.ts:
export const routes = [
  { path: '', pathMatch: 'full', redirectTo: 'add-contact' },
  {
    path: 'add-contact',
    component: AddContactComponent,
    data: {
      breadcrumb: 'Add Contact'
    }
  },
  { path: 'edit-contact',
    component: EditContactComponent,
    data: {
      breadcrumb: 'Edit Contact',
      pauseDisplay: true
    }
  },
  {
    path: 'view-contacts',
    component: ViewContactsComponent,
    data: {
      breadcrumb: 'View Contacts'
    }
  },
  {
    path: 'view-contact',
    component: ViewContactComponent,
    data: {
      breadcrumb: 'View Contact',
      pauseDisplay: true
    }
  }
];
Go through that array up there and you'll see that the code sets the breadcrumb property for all the routes. It also sets the pauseDisplay boolean for some of the routes.
Why? Because not all of the routes need the display paused. The View Contacts route, for example, will display the breadcrumb name as "View Contacts" immediately with no change.
However, the Edit Contact route will need a contact name displayed in the breadcrumb.
Now if you go back to the previous code block you'll see that data is expressed as an Observable. So that code subscribes to it and constructs the Breadcrumb object based on the info it retrieves.
So let's take a closer look at this:
      if (breadcrumb) {
        if (breadcrumb.url != this.breadcrumbs[this.breadcrumbs.length - 1].url) {
          route.queryParams.subscribe((queryParams: any) => {
            if (queryParams) {
              breadcrumb.queryParams = queryParams;
            }
          });

          this.breadcrumbs.push(breadcrumb);
        }
      }
The first if checks to make sure a Breadcrumb object got instantiated.
The second if prevents the code from creating a new Breadcrumb object if the user clicked on a link somewhere in the list of breadcrumbs.
Why is that necessary? Because if the user clicks a breadcrumb link, this code will execute again. But you don't want to create another breadcrumb when the user is already on that page.
Trust me. Take that second if out and you'll see repeats in your breadcrumbs.
However, if the code makes it past both of those if statements, it grabs the query parameters from the ActivatedRoute object and adds them to the Breadcrumb object.
Then, the code just adds the instantiated Breadcrumb to the array.
  private handleTopLevelBreadcrumb(navItem: NavItem) {
    this.breadcrumbs = [];

    let breadcrumb: Breadcrumb = { name: navItem.displayName, url: navItem.route };

    this.breadcrumbs.push(breadcrumb);
  }
That's the method that gets used when the code finds a match between the current URL and a URL associated with one of the menu items in the left-hand navigation bar.
All it does is construct the Breadcrumb object from the data in the NavItem object and then make it the first element in a newly created array.
  private findRoute(navItems?: NavItem[]): NavItem {
    if (!navItems) navItems = menu;

    let returnedItem: NavItem = null;

    if (this.currentUrl) {
      for (let item of navItems) {
        if (this.currentUrl == item.route) {
          returnedItem = item;
          break;
        } else if (item.children) {
          returnedItem = this.findRoute(item.children);
          if (returnedItem != null) break;
        }
      }
    }

    return returnedItem;
  }
Here's the findRoute() method I mentioned earlier.
It takes an optional parameter that's an array of NavItem objects. Then it does some recursive traversing to identify any matches in the array (or any of the children in the elements in the array) to find a match between the current URL and the URL associated with a navigation item on the left-hand sidebar.
By the way: if no parameter is passed in then the code starts the traversing at the top-level of the navigation items in the sidebar menu.
  routeTo(index: number) {
    if (index < this.breadcrumbs.length - 1) {
      this.breadcrumbs.splice(index + 1);
    }

    let breadcrumb: Breadcrumb = this.breadcrumbs[index];

    let route = breadcrumb.url;
    this.router.navigate([route], { queryParams: breadcrumb.queryParams });
  }
The routeTo() method gets called when the user clicks on any of the breadcrumb links.
It takes in a single parameter: a number that corresponds to the position in the array of the breadcrumb that the user just clicked. So if the user clicked the second element in the list of breadcrumbs, the index parameter would equal 1 because the code uses 0-based indexing.
That if statement at the beginning checks to see if the user clicked on any breadcrumb that's not the last breadcrumb. If so, then the code removes all breadcrumbs after that point.
Why? Because the user took a step back. No need to show the other breadcrumbs that represent what happened after that point anymore.
Next, the code finds the Breadcrumb object associated with index. Then it routes the user to the URL associated with that object, adding in any parameters along the way.
Remember: you can view the full source for the breadcrumb.component.ts class on GitHub.
Time for the Template
In the home stretch, folks.
Now update the breadcrumb.component.html template. Make it look like this:
<div class="route-content-top">
  <ol class="breadcrumbs">
    <li *ngFor="let breadcrumb of breadcrumbs; index as i; last as isLast">
      <ng-container *ngIf="!breadcrumb.pauseDisplay">
        <span class="breadcrumb-current-route" [class.breadcrumb-history-link]="!isLast" (click)="routeTo(i)">{{breadcrumb.name}}</span>
        <span *ngIf="!isLast"> » </span>
      </ng-container>
    </li>
  </ol>
  <hr/>
</div>
That's not too bad, is it?
The HTML starts off with a <div> element that adds some styling. I'll show you the styling in a moment.
Next, the code uses an ordered list element (<ol>) to show the breadcrumbs. Because that's what the cool kids are doing these days.
The <li> element uses the *ngFor structural directive to iterate over every object in the breadcrumbs array in the component.
Note, however, that the for loop also keeps track of the index and the last element. You'll see why in a moment.
Next, the code uses <ng-container> because that's an element that doesn't affect the DOM. It's basically a placeholder for that *ngIf directive you see there.
Speaking of that directive, it stops output of the breadcrumb if the pauseDisplay boolean is set to true. That's because the element isn't ready for display until pauseDisplay is set to false.
Next, the code includes a couple of <span> elements.
The first one shows the breadcrumb name. It also adds hyperlink styling to the name if the breadcrumb isn't the last one.
Why? Because the user doesn't need a link to the current route. That's silly.
That element also includes a (click) event handler that responds when a user clicks on a breadcrumb name. It takes the user to a new route dictated by that routeTo() method so you saw earlier.
The second <span> element shows the breadcrumb separator but only if the current breadcrumb isn't the last one.
Going out in Style
All that coding isn't going to be good enough if you don't make your breadcrumbs look pretty. Here's some code you should add to styles.css to help make the UI user-friendly.
ol.breadcrumbs {
  padding: 0;
  list-style-type: none;
}

.breadcrumb-current-route {
  color: inherit;
  font-weight: 500;
}

.breadcrumb-history-link {
  color: #3F51B5;
  text-decoration: underline;
  cursor: pointer;
}

ol.breadcrumbs li {
  list-style-type: none;
}

@media only screen and (min-width: 960px) {
  ol.breadcrumbs li {
    list-style-type: none;
    display: inline
  }

  .route-content-top {
    height: 30px;
  }
}
That first styling (ol.breadcrumbs) removes the default styling for ordered lists.
The breadcrumb-current-route class styles the breadcrumb name minus any styling associated with a link.
That link styling happens with the breadcrumb-history-link class.
The ol.breadcrumbs li styling removes default styling from individual list items.
That brings us to the @media thing. What the heck is that?
Keep in mind that you're designing an app that needs to look great on any platform, be it a desktop, laptop, smartphone, or tablet.
That @media at-rule changes the styling a bit if the user is on a medium or larger viewport (960 pixels wide or more). In that case, the breadcrumbs will display horizontally (display: inline) rather than vertically. That styling also maxes out the height of the breadcrumb bar at 30 pixels.
And Finally...
Now you just need to add the breadcrumb output to the right template. Edit features.component.html and add it here:
  <mat-sidenav-content>
    <app-breadcrumb></app-breadcrumb>
    <router-outlet></router-outlet>
  </mat-sidenav-content>
You see that <app-breadcrumb> element up above? That's it. That's all you need to do.
All the other code you wrote takes care of the rest.
Wrapping It Up
Congratulations! You now have a fully functioning breadcrumb bar!
No need to do the "let's test it out" thing here because you've already seen the end result up above.
Now it's up to you to take what you've learned and apply it to your own Angular applications.
And remember: you can always grab the source code from GitHub.
Have fun!
Photo by Mariana Kurnyk from Pexels


