Yeah. It's that easy.
Sometimes in Angular development, you might need to disable an entire form.
As in: not just a single field, but the whole form.
Fortunately, the good folks who invented TypeScript made it easy for you to do that. In this guide, I'll show you how.
Or you can just go straight to the source code.
Remember: if you're having problems running the Angular app locally, be sure to check the README.
Please note: this guide is a part of an ongoing series of tutorials on how to create a customer relationship management (CRM) application from scratch. The GitHub code for each guide belongs to a specific branch. The master branch holds the entire application up to the current date. If you want to follow the whole series, just view the careydevelopmentcrm tag. Note that the website displays the guides in reverse chronological order so if you want to start from the beginning, go to the last page.
The Business Requirements
Your boss Smithers walks into your office huffing and puffing like he just sprinted there.
"We got a problem with that CRM app you're working on," he says between deep breaths.
"People are editing un-editable activities!" he tells you, almost yelling. "We can't let people edit un-editable activities!"
"Sure, I know you took out the edit icons so people can't click and edit the system-created activites," he continues. "But power-users are encoding the URL with the ID of un-editable activities! They've found a workaround! Take care of this!!!"
He runs out of your office.
The Problem
The problem, as Smithers explained, is people trying an end-run around the UI and encoding URLs so they can edit activities they aren't supposed to edit.
As it stands now, the application recognizes two types of activities: user-created and system-created.
Users can edit user-created activities. But they can't edit system-created activities.
Except they can. Because they're cheating.
You'll put a stop to that with just a little bit of code.
The Volstead Prohibition Enforcement Act
What you need to do is set a boolean that prohibits users from editing system-created activities. Even if they put the ID in the URL.
Start by editing activity-form.component.ts. In the part of the code where you verify that the user is editing an activity rather than creating a new one, add this bit:
      if (!this.activity.type || this.activity.type.activityTypeCreator != 'USER') {
        this.alertService.error("This activity isn't editable");
        this.prohibitedEdit = true;
      }
That if statement will check to make sure that the ActivityTypeLightweight object has an activityTypeCreator property set to "USER."
If it does, then the user is allowed to edit the form.
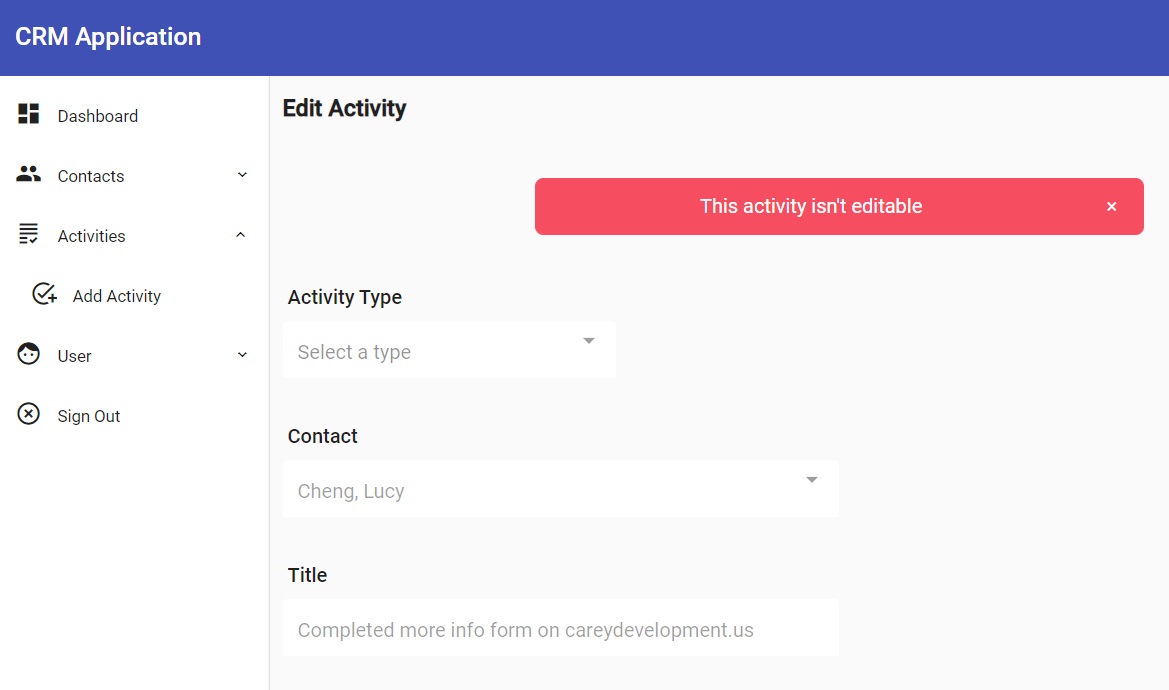
Otherwise, the code invokes the alert service to print a nice red box on the screen that informs the user that the activity isn't editable.
Finally, it flips the prohibitedEdit boolean to true.
It doesn't touch the form at this point because the form isn't created yet.
When the form finally does get created though, you need to add this code:
  private handleProhibition() {
    if (this.prohibitedEdit) {
      this.activityFormGroup.disable();
    }
  }
There's the check and the disable() method that I advertised in the title.
Yes. It's that simple.
All you need to do is call disable() on the FormGroup object that you're working with.
Alternatively, you could disable every control in the form individually. But... why?
Just disable the whole form.
And while you're there, might as well throw in some code in the associated template that gets rid of the button if the form isn't editable.
        <div style="margin-bottom: 15px">
          <button *ngIf="!saving && !prohibitedEdit" mat-raised-button color="primary" (click)="saveActivity()">Save Activity</button>
          <mat-spinner *ngIf="saving" [diameter]="50"></mat-spinner>
        </div>
Note that *ngIf structural directive. It won't show the button if prohibitiedEdit is set to true.
Proof in Prohibition
Now it's time to make sure it works.
Try to edit an activity that's system-generated (such as when a contact visits a web page or completes a web form). You should see something like this:

Bingo! That's exactly what you want.
The fields are greyed out indicating that users can't edit them.
So you win. Again.
Wrapping It Up
That was easy, wasn't it?
Now take what you learned here and stick it to those power users who try to make edits that they shouldn't attempt.
Of course, feel free to grab the code on GitHub.
Have fun!
Photo by Godisable Jacob from Pexels


